
Godot 4 Multiplayer Tutorial:
Add Multiplayer to a Platformer Game
What You'll Build
The GD-Sync Platformer Template is a complete single-player 2D platformer. Your character can run, jump, shoot bullets, collect coins, and fight enemies. In this tutorial you will transform it into a fully functional multiplayer game.
By the end, multiple players can join the same lobby, see each other move and animate in real time, shoot bullets that appear on every screen, and share the same enemies and coins. Everything stays perfectly synchronized with almost zero extra code.
What you need before you start
1
GD-Sync Platformer Template
Download the free template project from GitHub. It will be used as the foundation for this tutorial.
2
Godot 4.5+
Any stable Godot 4.5+ release works. Download from the official Godot website.
3
GD-Sync account and API key
Sign up for free here. You can create an API key on your account dashboard.
Part 1: Install and Configure the Plugin
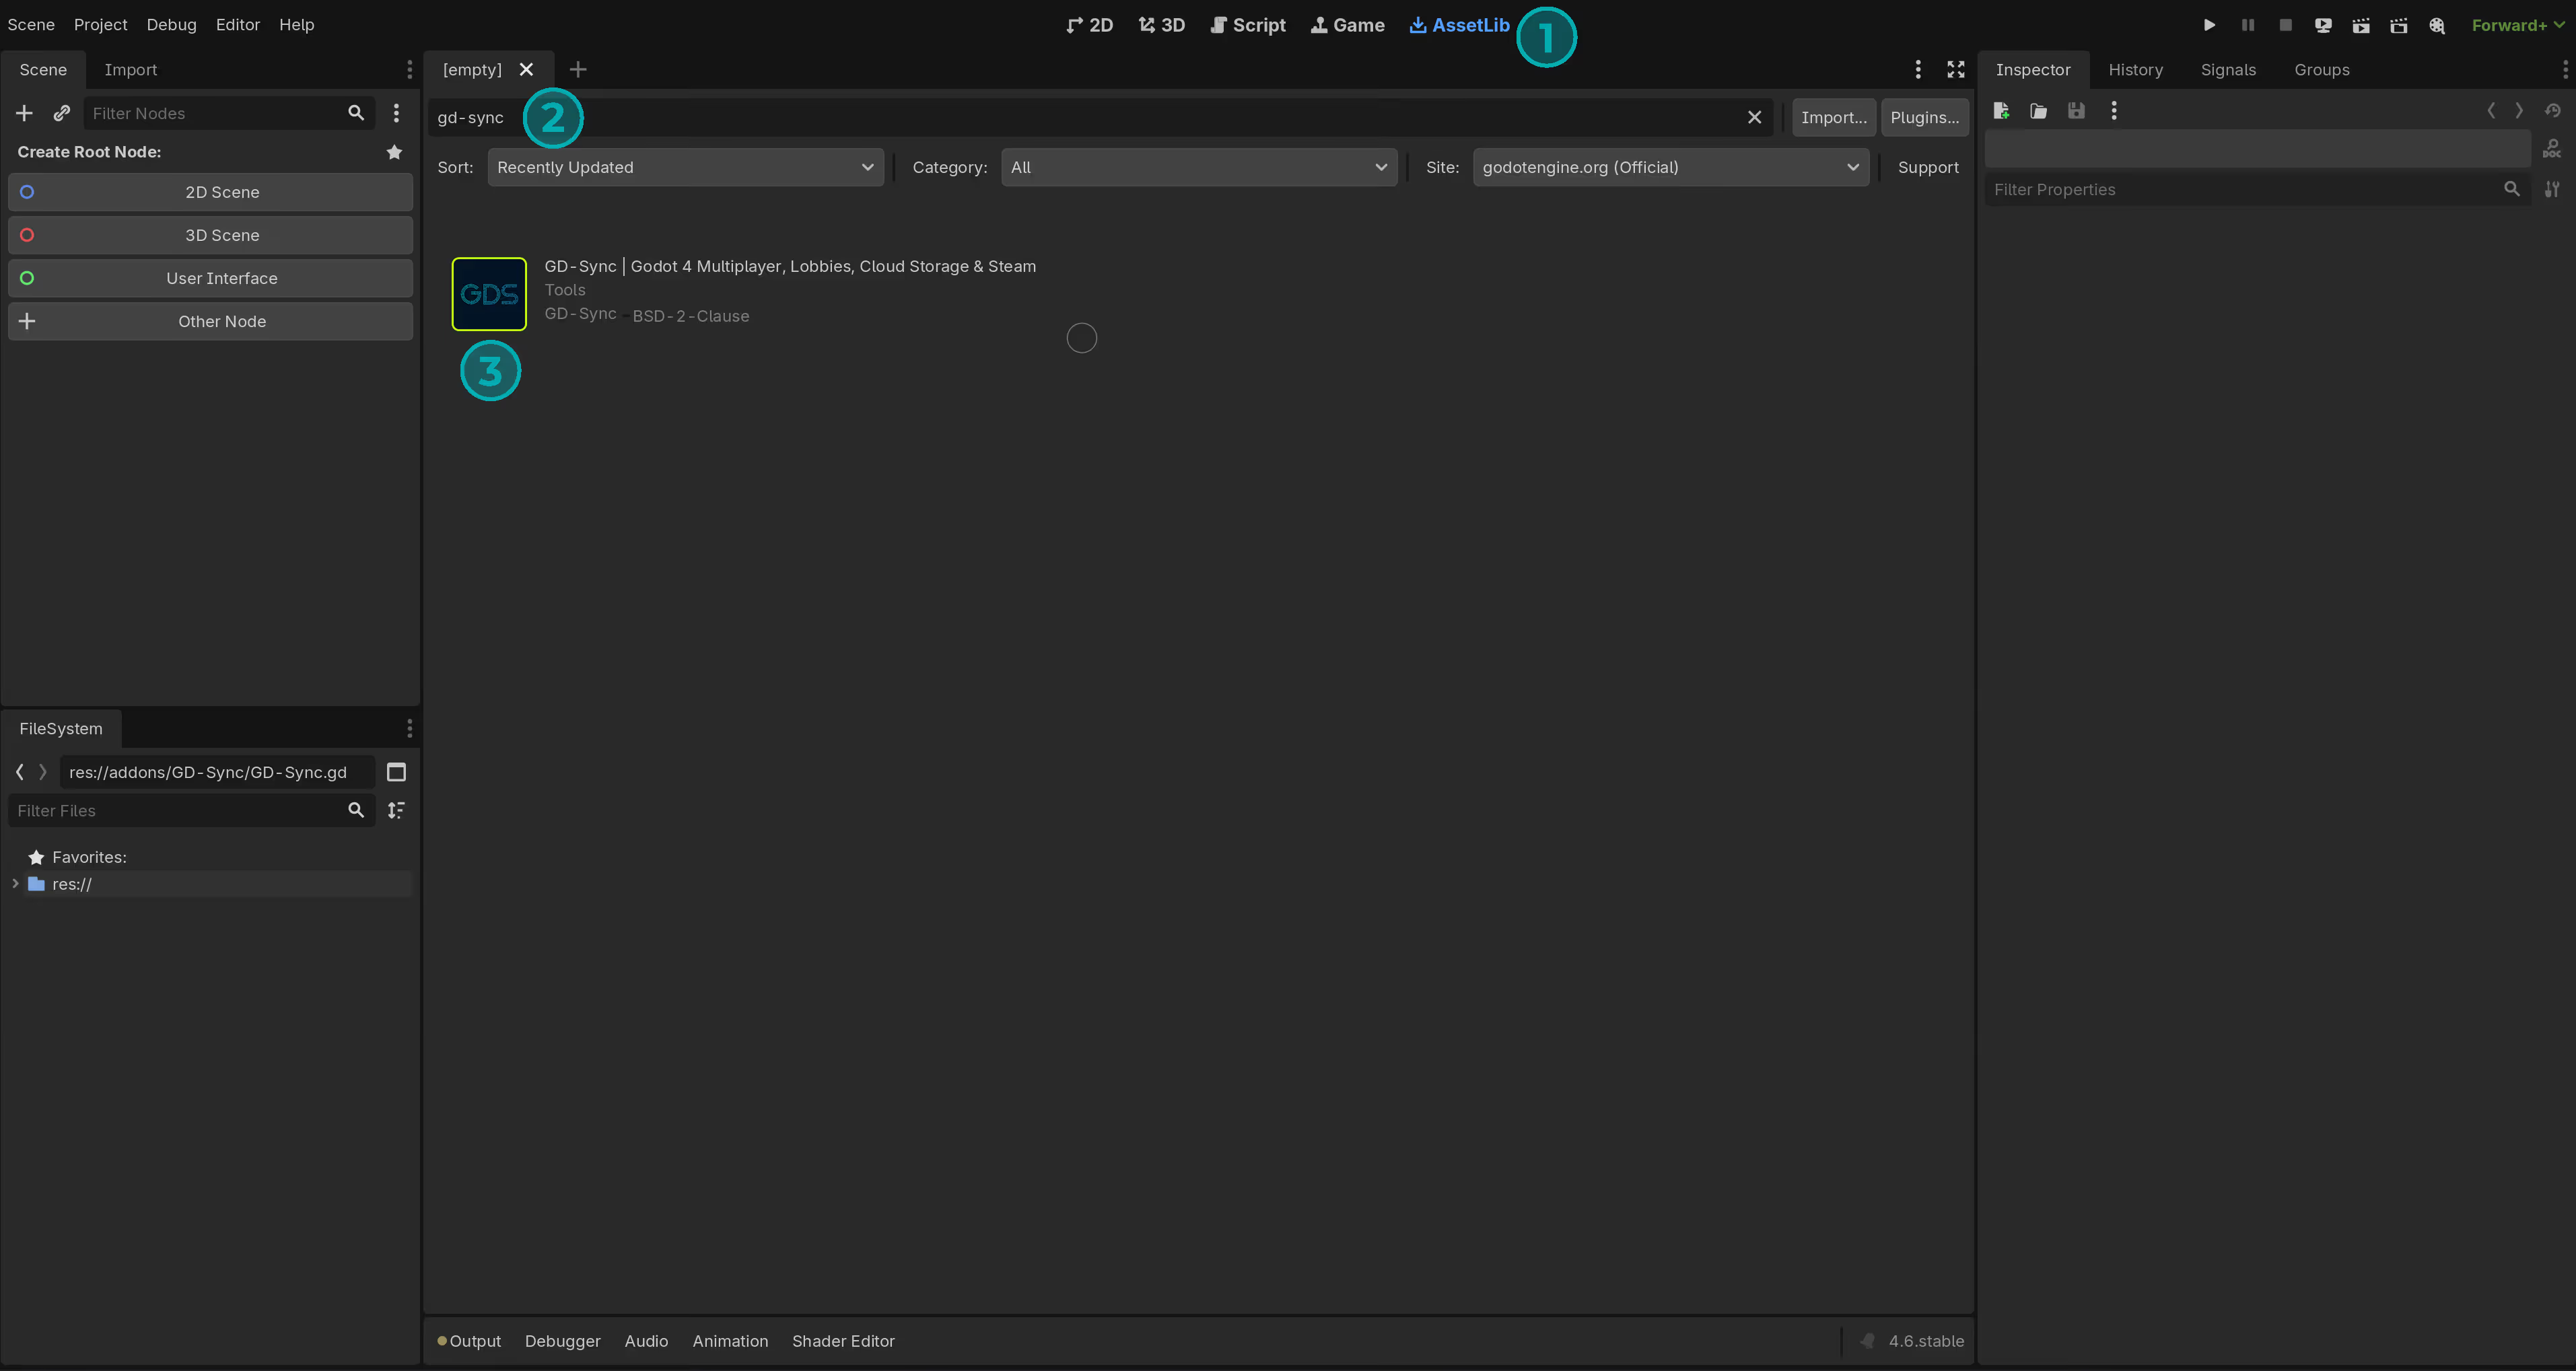
With the template project open, go to the AssetLib tab at the top of the editor. Search for GD-Sync, select the result, then click Download and Install. Accept the default files and confirm.
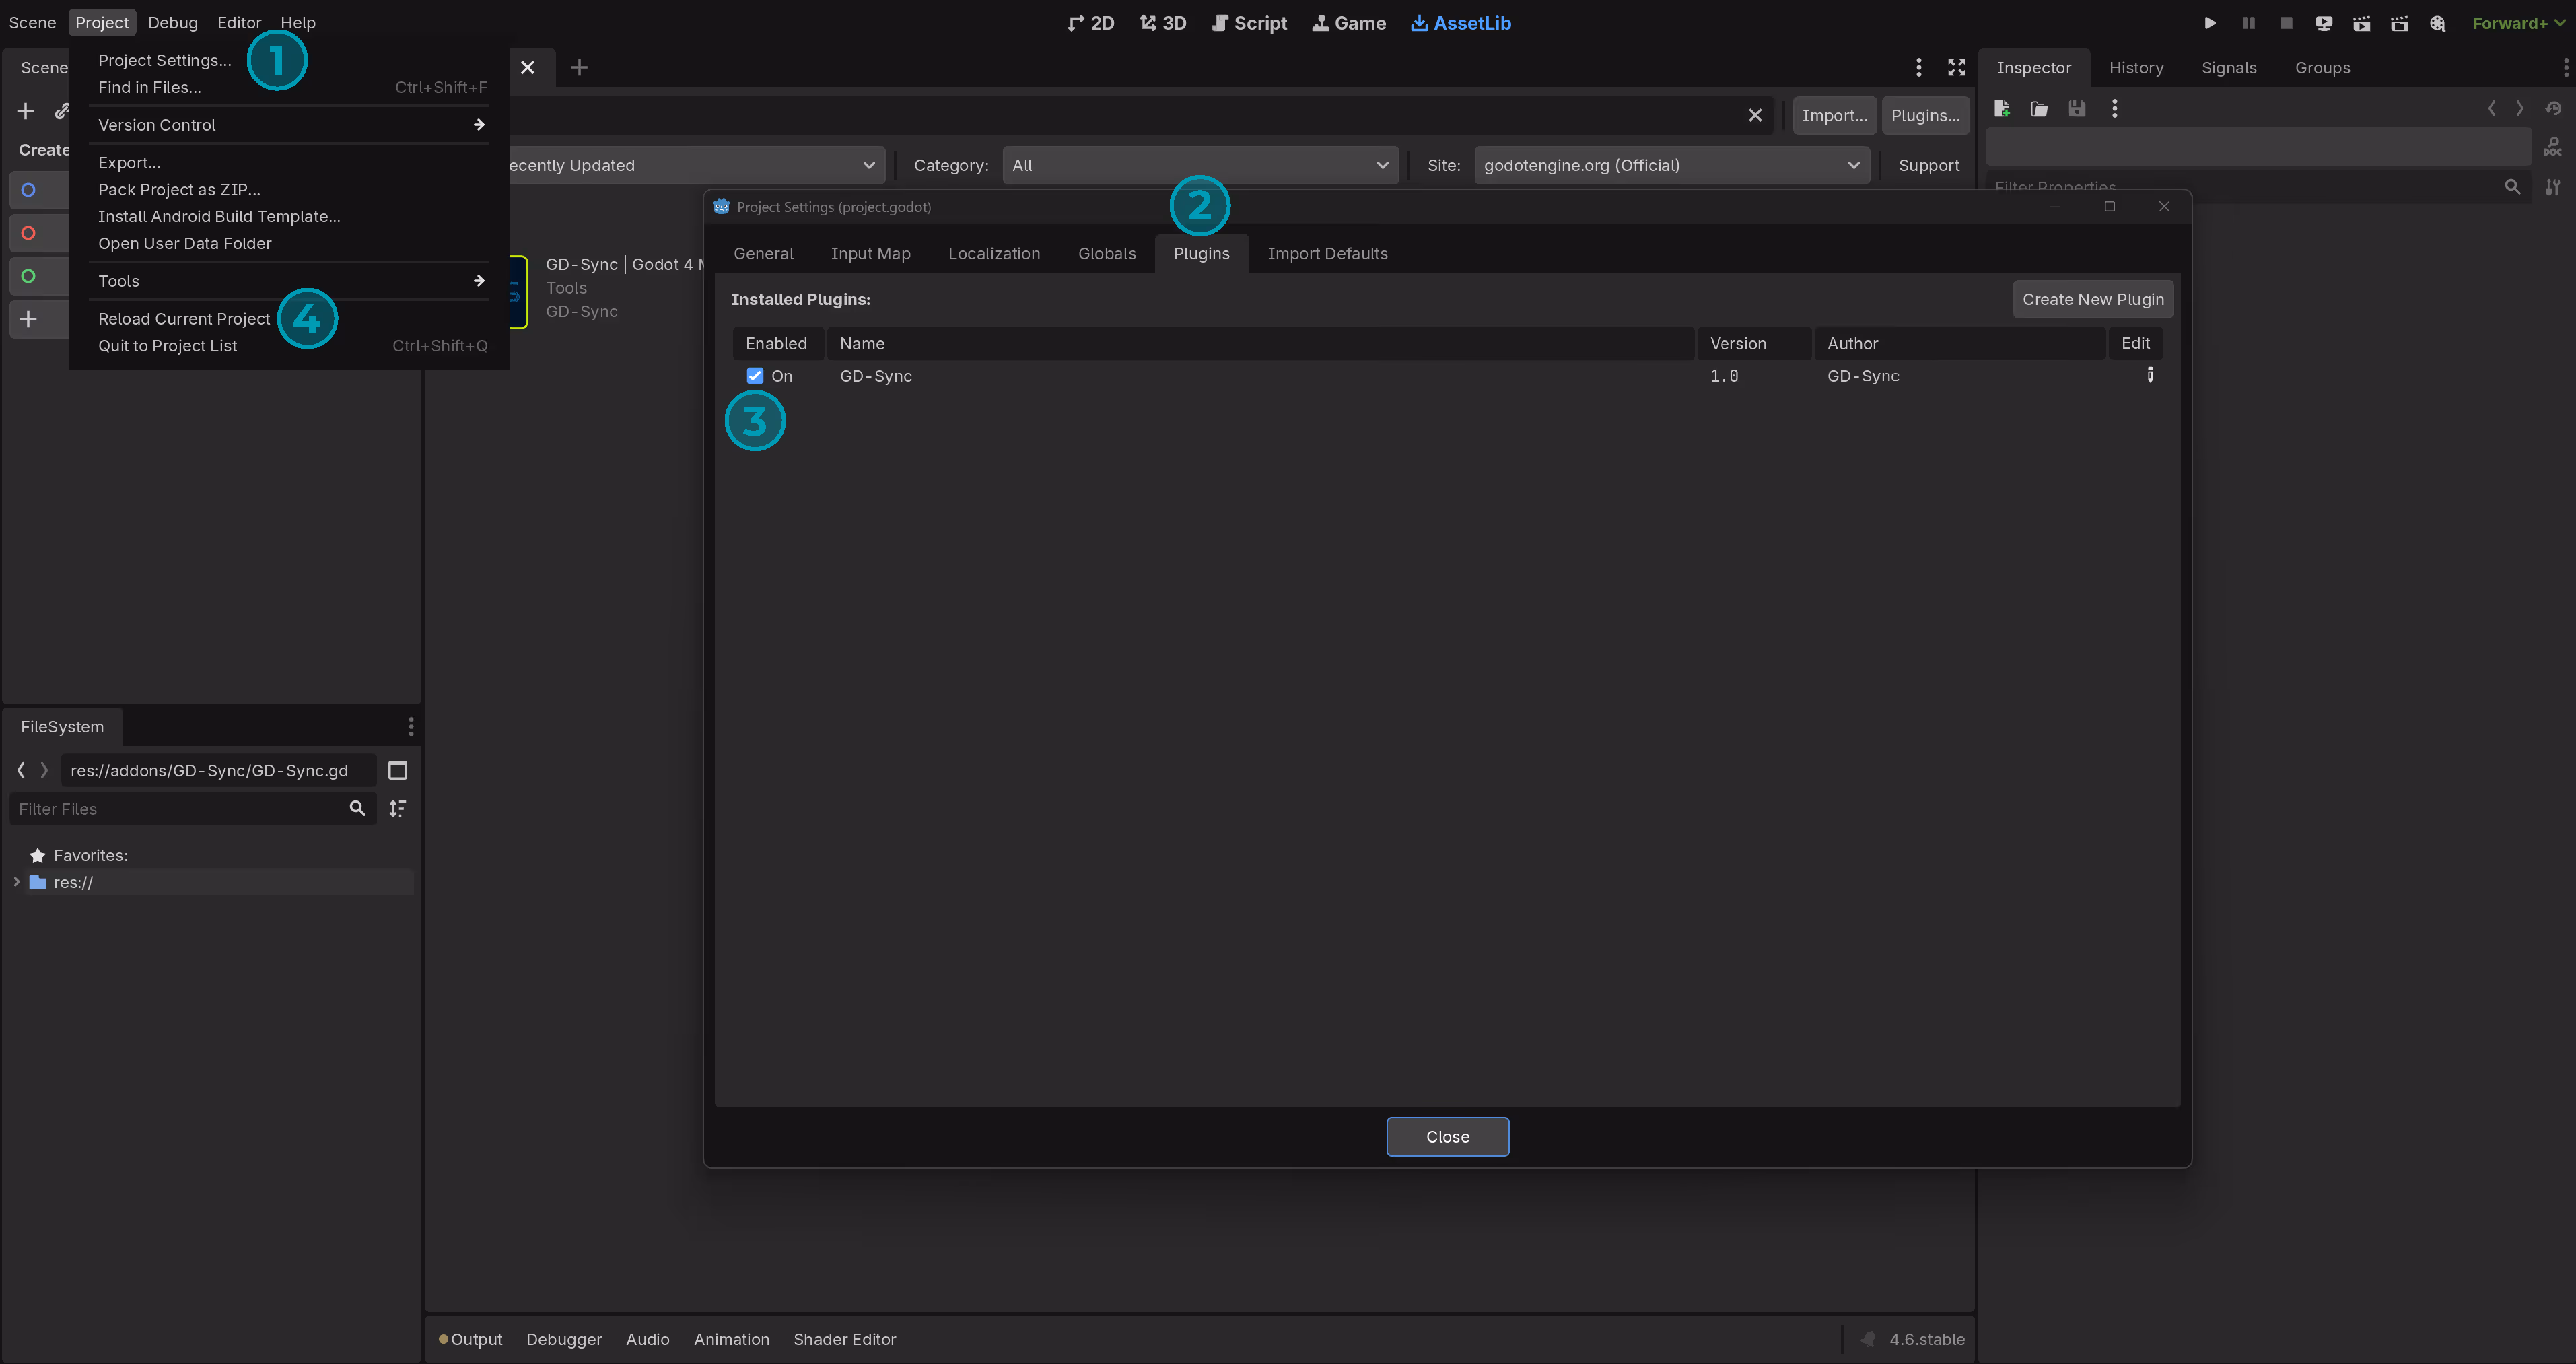
Next, open Project Settings, go to the Plugins tab, and enable GD-Sync. Reload the project when prompted. You will see a message that GD-Sync is enabled in the console after reloading.
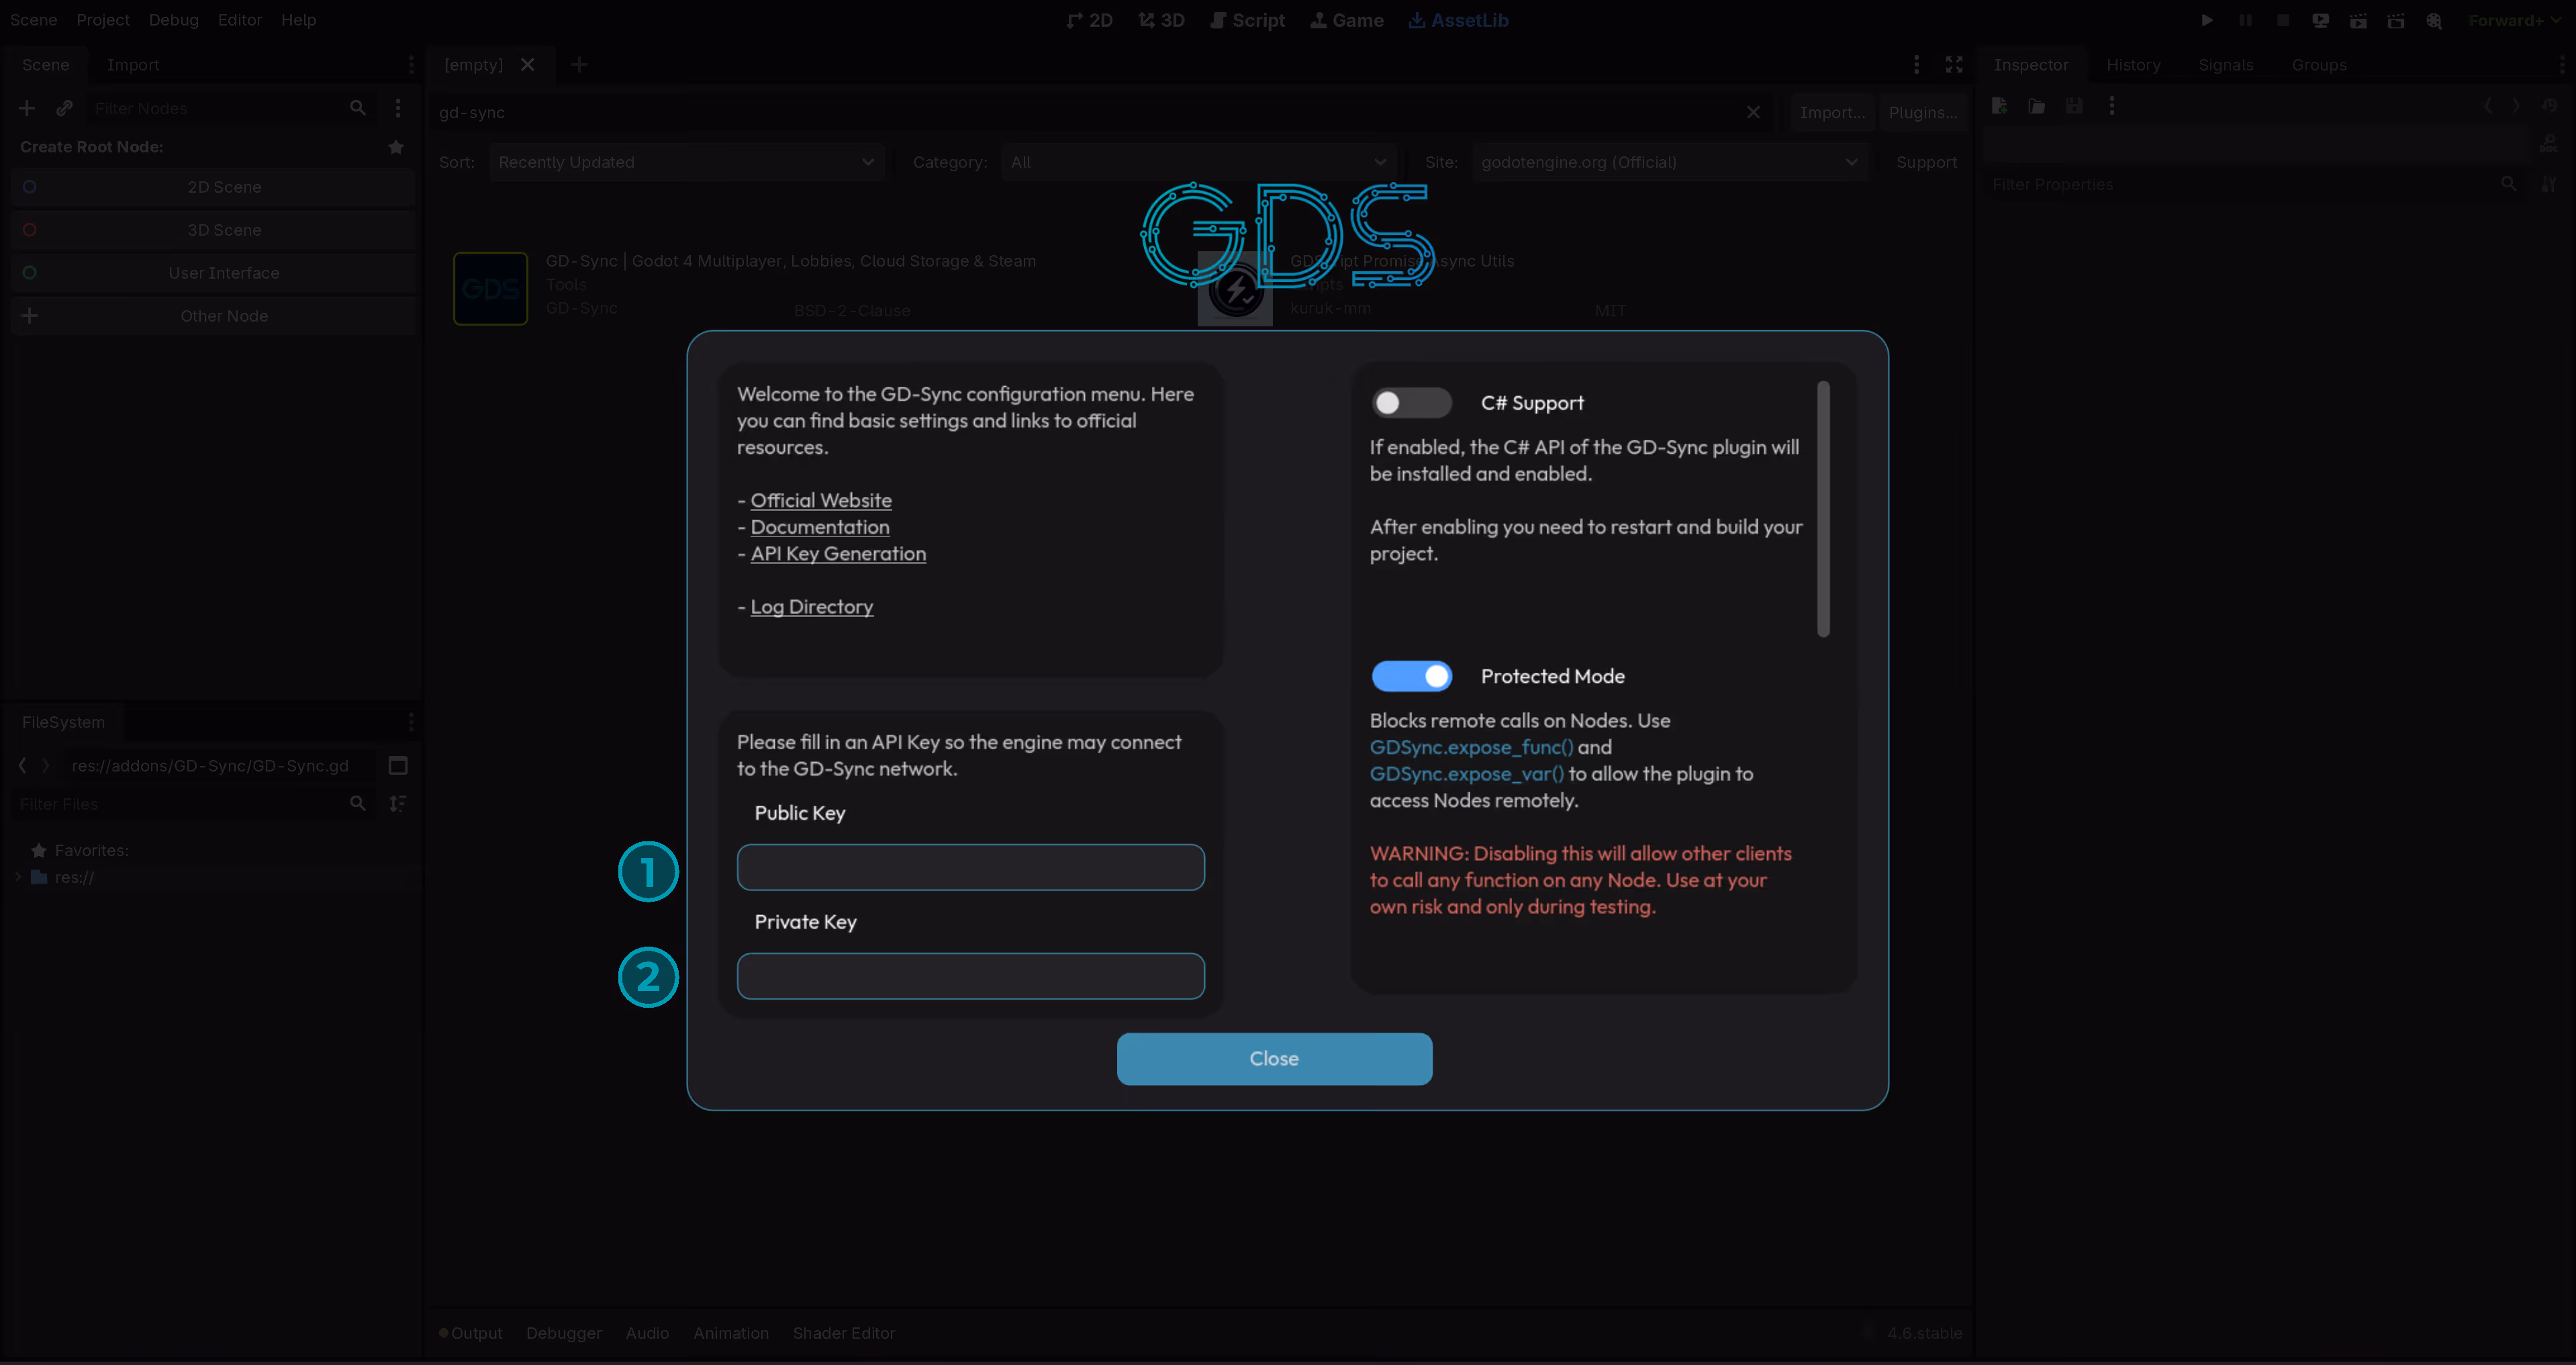
Open the GD-Sync configuration window from the top menu under Project > Tools > GD-Sync. Go to your GD-Sync dashboard, create a new API key for this project, copy it, and paste it into the field. Save the settings.
Why an API key? It authenticates your project and authorizes your game to use our global relay network. It also enables the collection of player statistics for your dashboard. While not required for local LAN play, it is essential for all online features.
Don't have an API key yet?
Create a free account and instantly get access to all features.
Part 2: Establishing a Connection
All GD-Sync features are accessible through the global GDSync singleton. To begin, open your main.gd script, this is where we will implement the core logic for connections and lobby management.
First, we need to listen for the connected and connection_failed signals. Once the listeners are set up, call GDSync.start_multiplayer() to initiate a connection to the GD-Sync network. If the plugin successfully reaches a server, the connected signal will fire. If not, connection_failed will be emitted.
If you run the project, you should see it print that the client is now successfully connected in the console. Now that the connection is established, we can start working on the lobby code.
Part 3: Creating & Joining Lobbies
Now that your project is connected to the GD-Sync network, players need a place to meet. In GD-Sync, lobbies act as private or public rooms where players are grouped together to share data. Without a lobby, players are connected to the network but remain isolated.
Just like with connecting, we need to listen to specific signals when creating a lobby. We must listen to the lobby_created and lobby_creation_failed signals. Once those signals are connected, we can create a lobby with GDSync.create_lobby(). For this tutorial, we will simply create a lobby once we are connected.
Now that we can create a lobby, we need to join it. We must first connect the lobby_joined and lobby_joined_failed signals. Then we can call GDSync.join_lobby() to join the lobby we are creating.
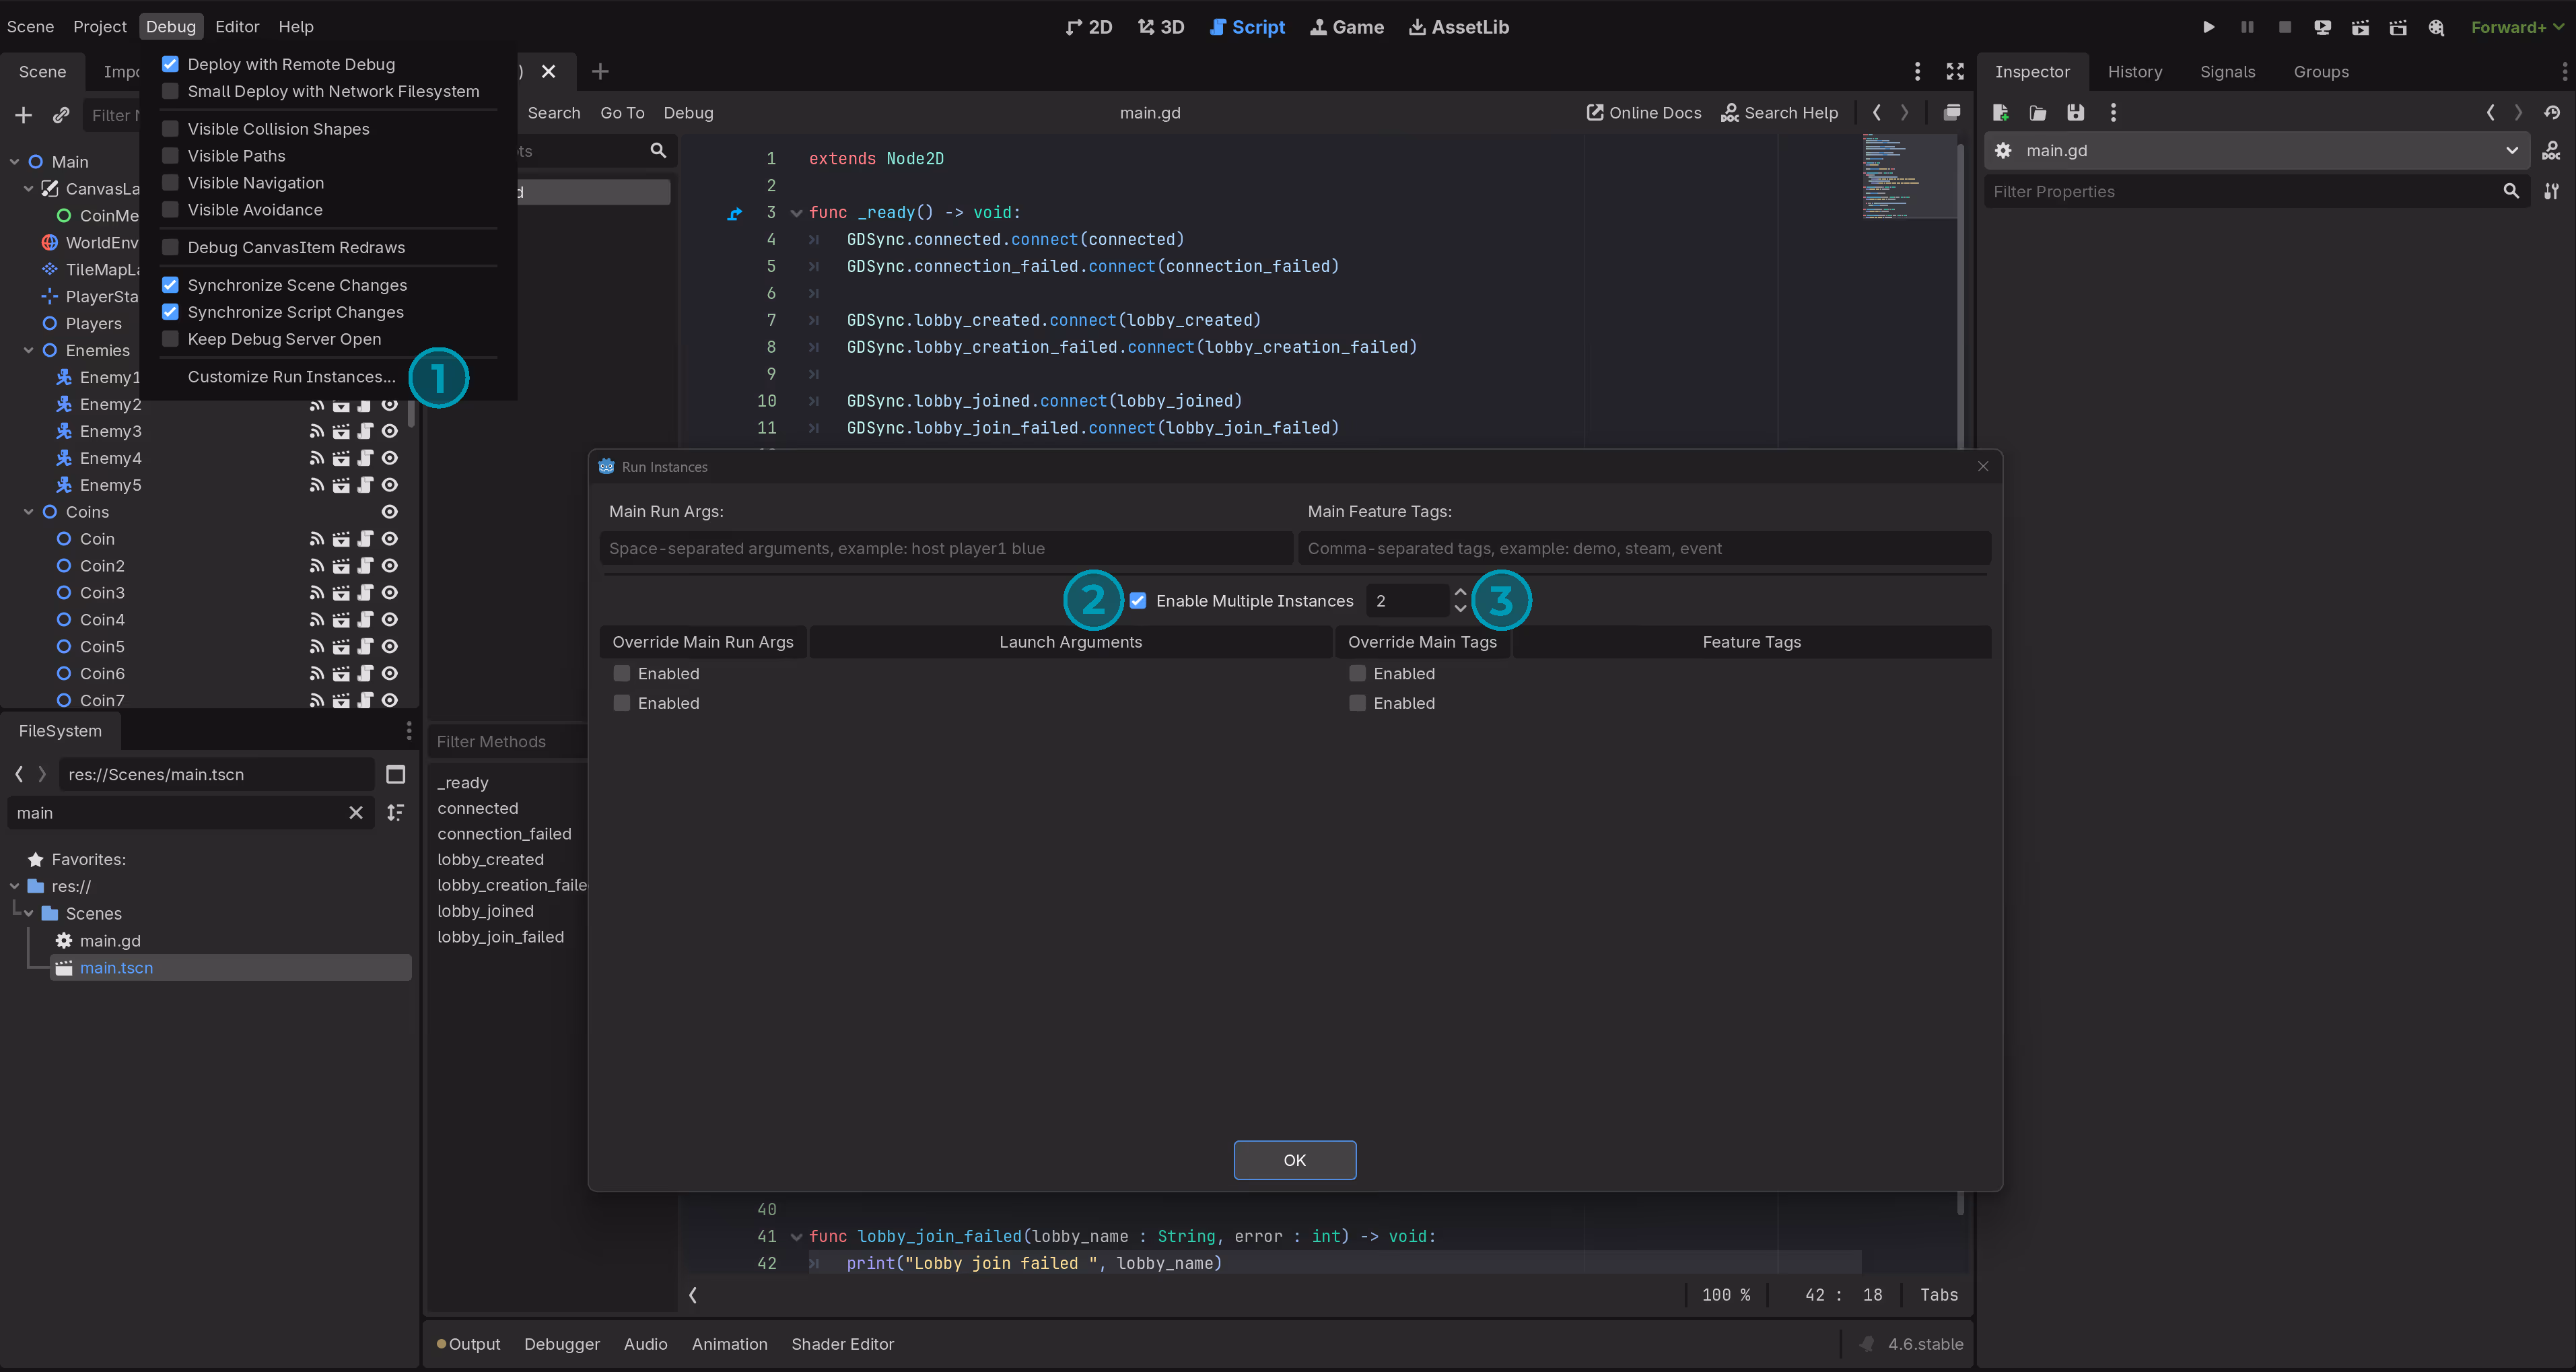
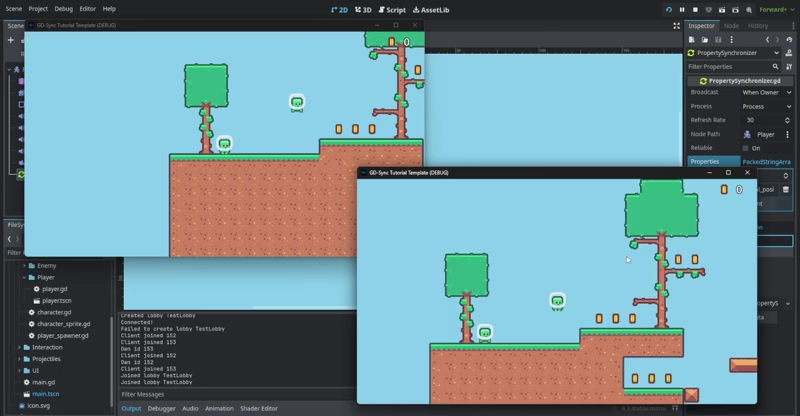
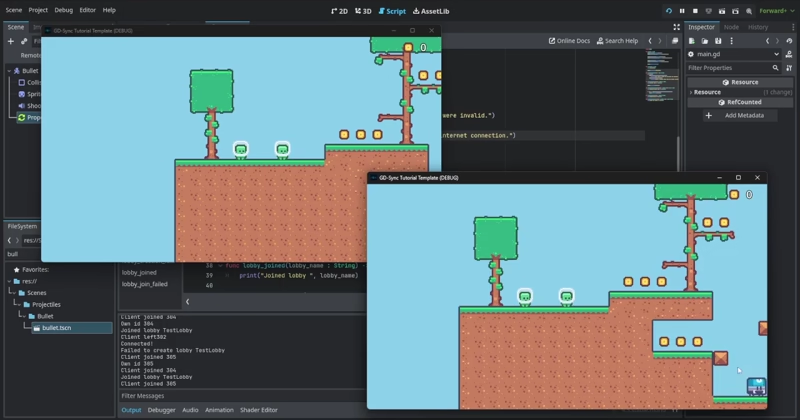
Godot allows us to easily test multiplayer, as you can tell the engine to start multiple instances of your game instead of just one. To do this, go to Debug > Customize Run Instances. There you can click Enable Multiple Instances and select how many instances you want to launch.
Once enabled, every time you press the Play button, Godot will open the specified number of windows. This allows you to create a lobby in one window and join it from the other to verify your multiplayer logic in real time.
If you now run the game, two instances of your game launch. You should see that both players successfully connect to the network. In this setup, one player creates the lobby and joins it, and the other player joins it immediately after.
Part 4: Spawning & Synchronizing Players
Now that we have successfully joined a lobby on two clients, we can begin synchronizing the actual gameplay. First, remove the original player node from the scene tree because we will spawn all players from code instead. Delete the player node located at Players/Player.
Create a new script on the Players node and name it player_spawner.gd. In this script, we will listen for the client_joined and client_left signals. These signals are emitted on every client whenever someone joins or leaves the lobby.
When a client joins, instantiate a new player scene and add it as a child of the Players node. It is important that the node path of every spawned player is identical across all clients because GD-Sync uses the node path to locate and synchronize nodes remotely. Since Godot assigns random names to newly instantiated nodes, manually set each player's name to its client ID. This guarantees that the node path stays consistent on every client. Also assign ownership over the player to the joining client. This will later be used to give each client authority over their own player.
When a client leaves, use the same client ID to find and remove their player node from the scene.
Each client now has their own player spawned with ownership correctly assigned. However, every player scene currently responds to keyboard input. We need to make sure only our own player reacts to input. We will use the ownership we assigned earlier to achieve this.
In the player.gd script, call GDSync.connect_gdsync_owner_changed() to listen for ownership changes. Then check whether this player belongs to us. If it does, enable the camera so it follows our player instead of another client's player.
In the _physics_process function, add a simple check at the top that returns early if this is not our own player. This ensures all movement and input logic only runs for our local player. You can add the same kind of check in other functions as well. For example, in the kill function, make sure we can only kill our own player. This approach lets each client run its own player's logic locally while we synchronize the results to the other players later.
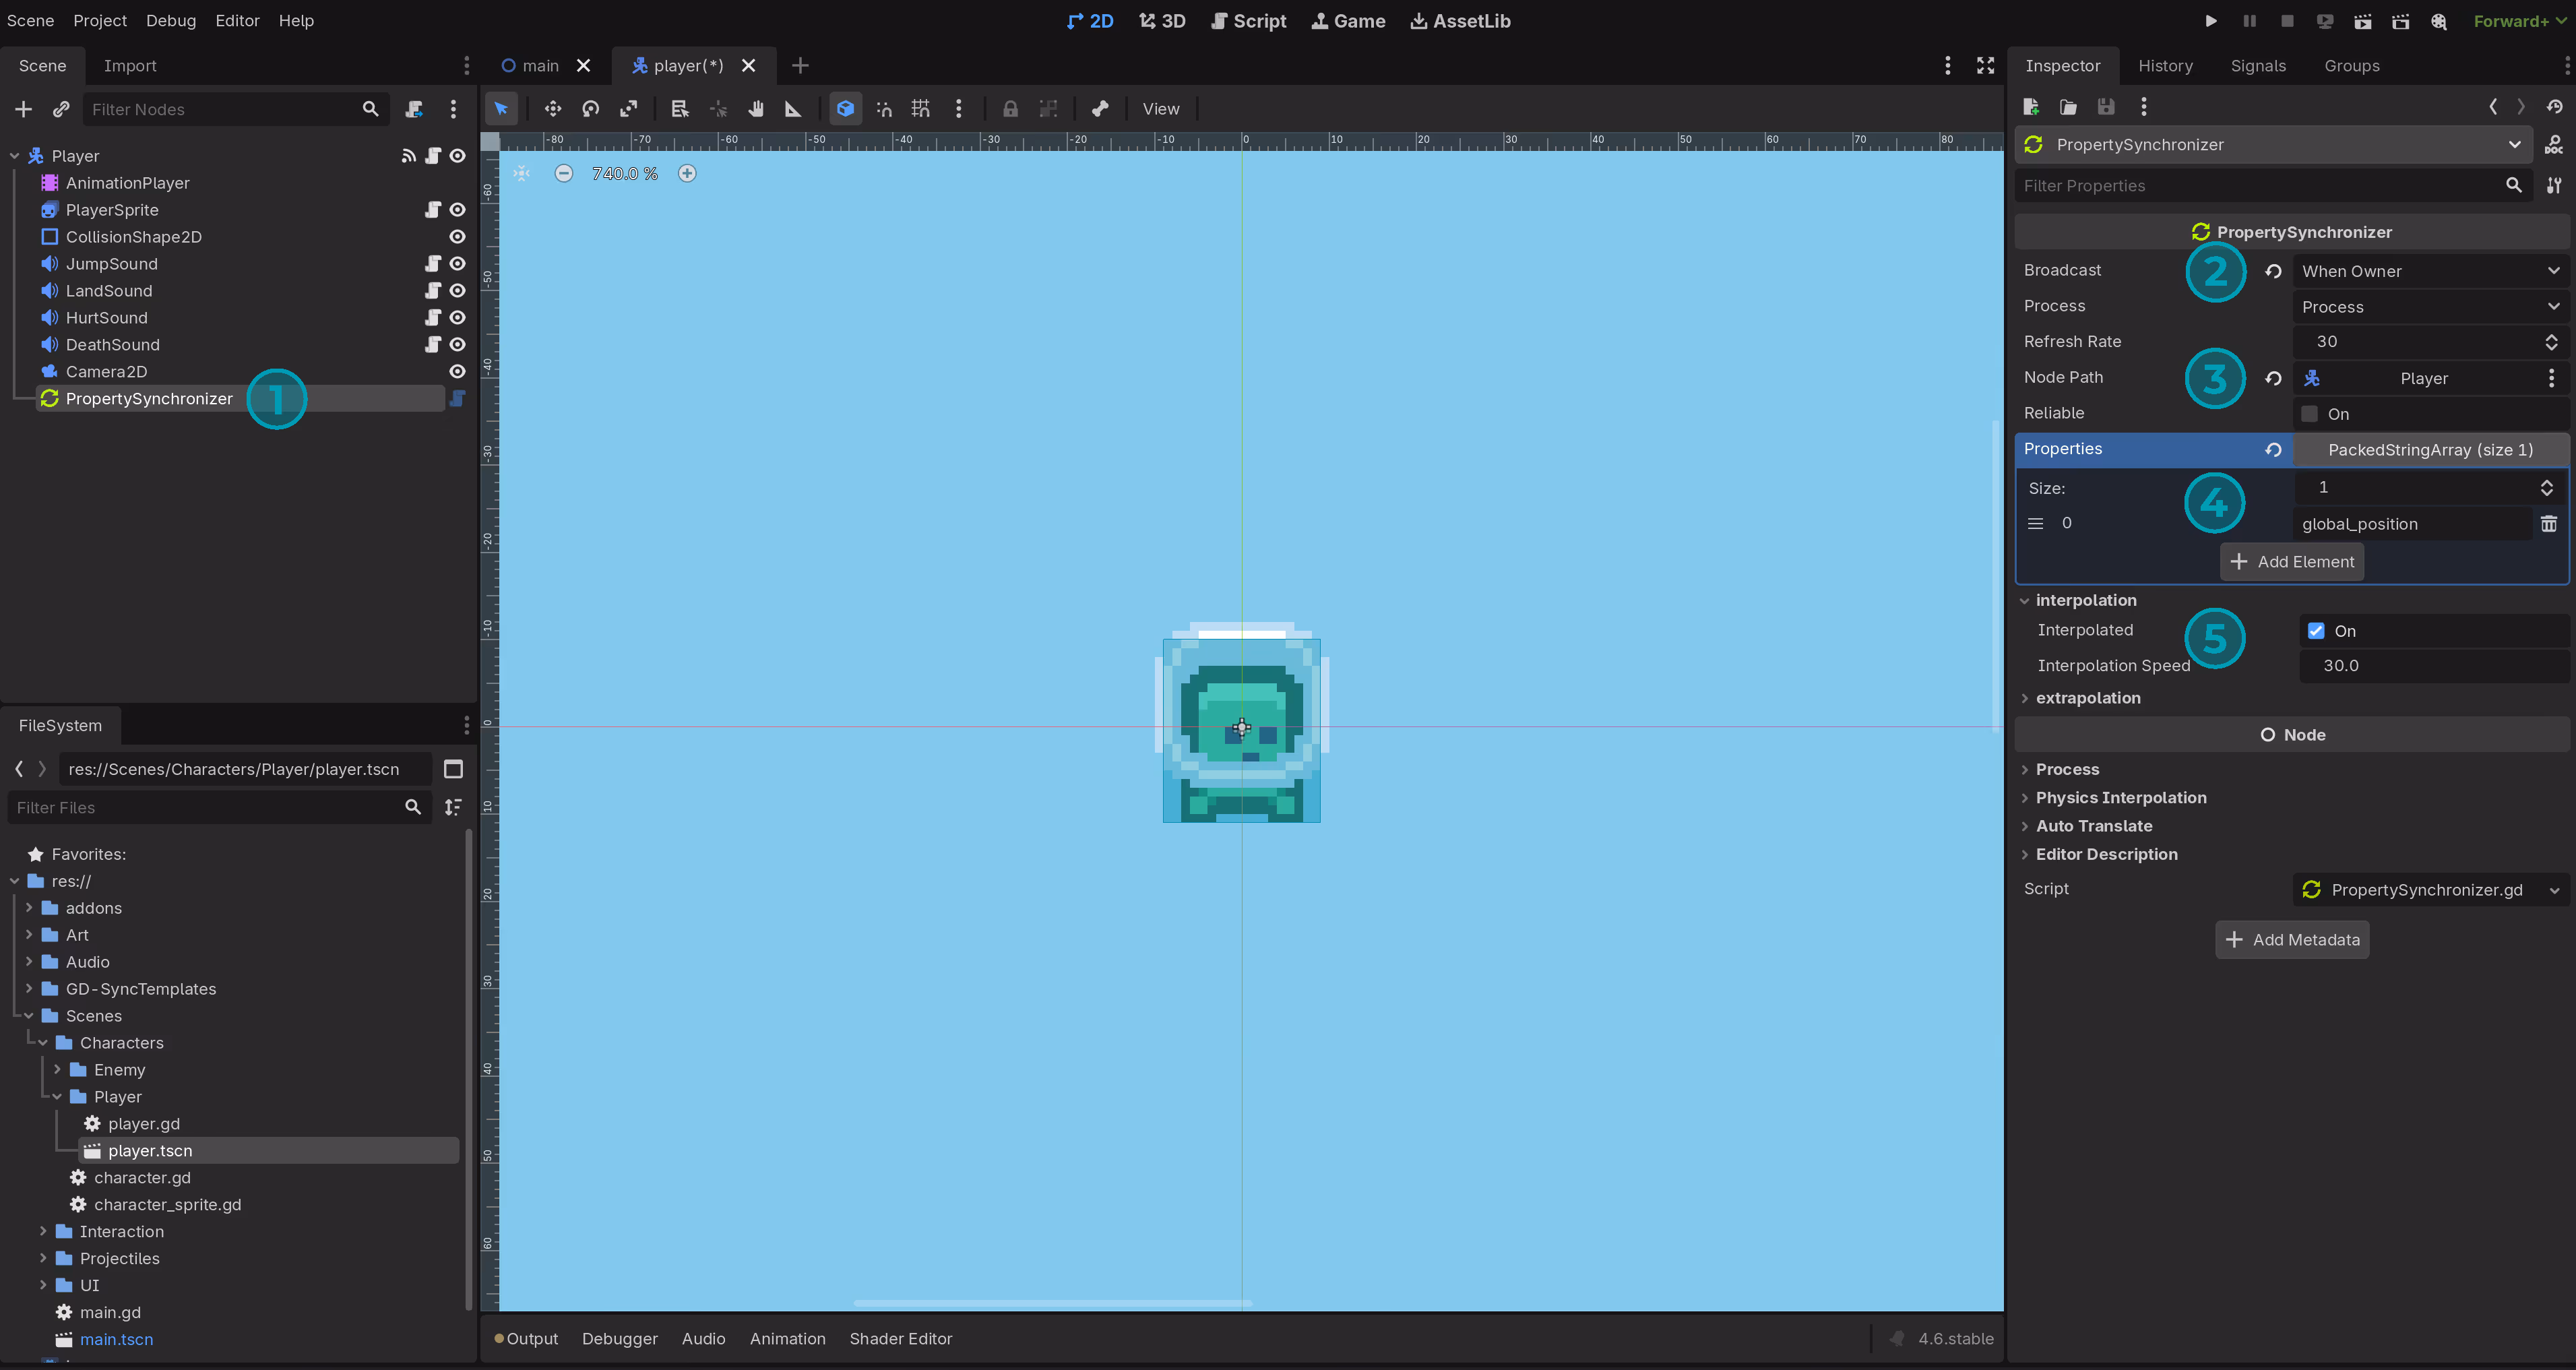
Now that we have full control over our own player and other players no longer respond to our keyboard inputs, we need to make sure everyone can see our movement. To do this, we will synchronize the position of our player using GD-Sync's PropertySynchronizer node.
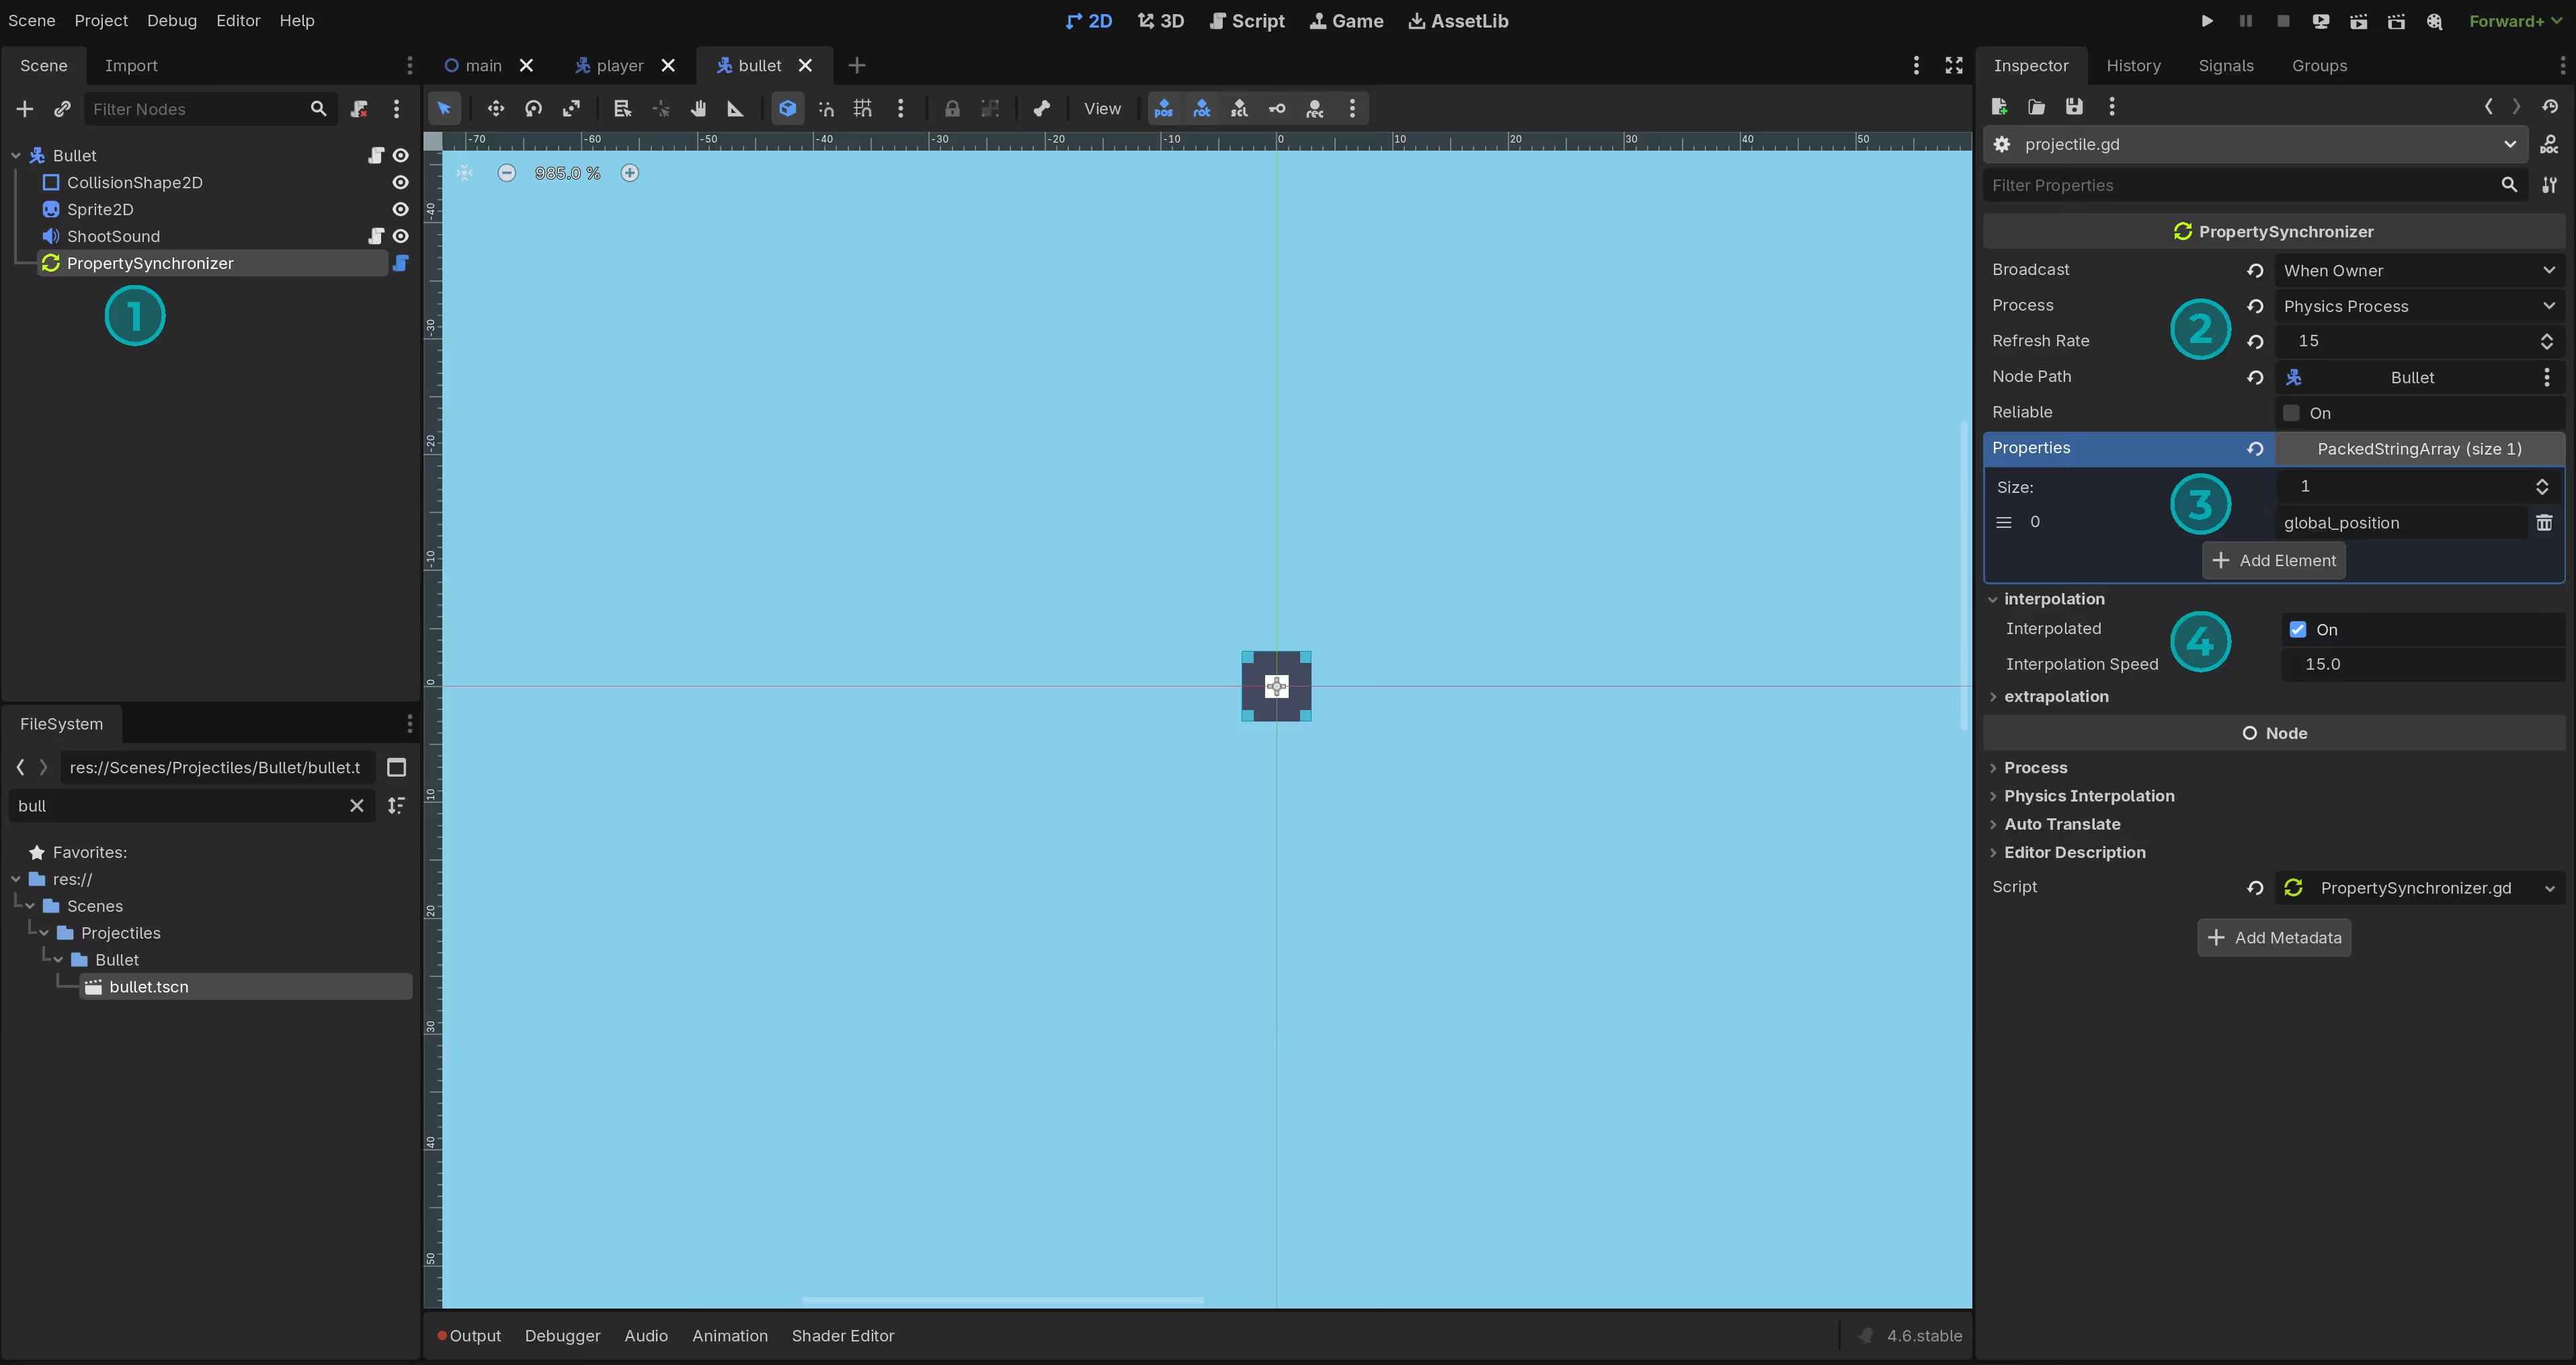
Open the player.tscn scene and add a PropertySynchronizer node as a child of the player. Set the Broadcast Mode to When Owner. This ensures that only our own player broadcasts its position to the other clients. Next, set the Target Node to the player itself. Add global_position to the list of properties to synchronize. Finally, enable interpolation to smooth out the movement between updates. It is recommended to set the interpolation speed to the same value as the Refresh Rate.
This simple setup will make all players see each other move smoothly in real time.
Players can now see each other move, but the animations are not yet synchronized. We need to synchronize both the AnimatedSprite and the AnimationPlayer that controls the death and respawn animations.
To synchronize the AnimatedSprite, right-click on it in the scene tree and change its type to SynchronizedAnimatedSprite2D. Once replaced, open the character_sprite.gd script and change the extends line from AnimatedSprite2D to SynchronizedAnimatedSprite2D. Then replace all calls to play() with play_synced().
This ensures the animation state stays perfectly in sync across all clients.
The AnimationPlayer also needs to be synchronized. Right-click on the AnimationPlayer node in the scene tree and change its type to SynchronizedAnimationPlayer.
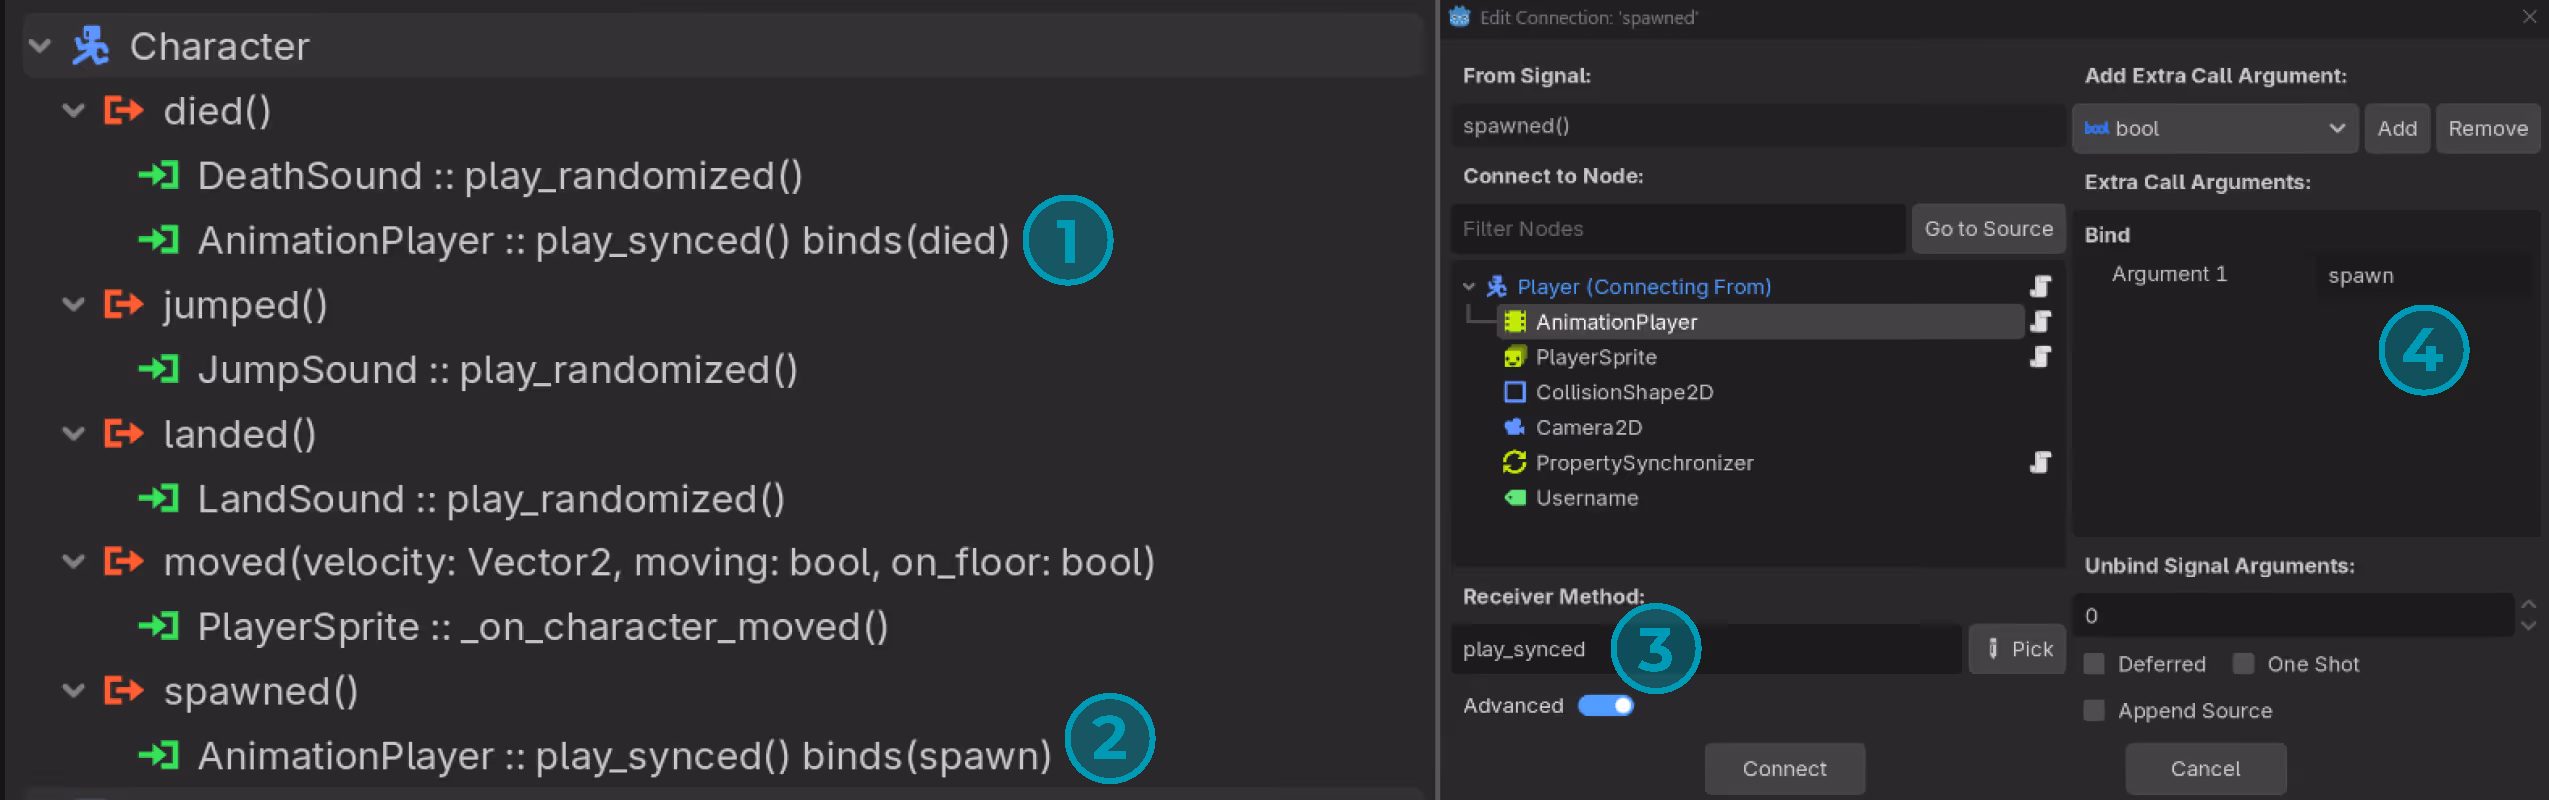
Changing the node type resets the signal connections, so we must restore them. The died signal should call play_synced with "died" as the animation name. The spawned signal should call play_synced with "spawn" as the animation name. You can edit the signals by right-clicking on them and selecting Edit. Make sure the connections exactly match the setup shown in the image below.
This keeps the death and respawn animations perfectly synchronized for all players.
Part 5: Spawning & Synchronizing Bullets
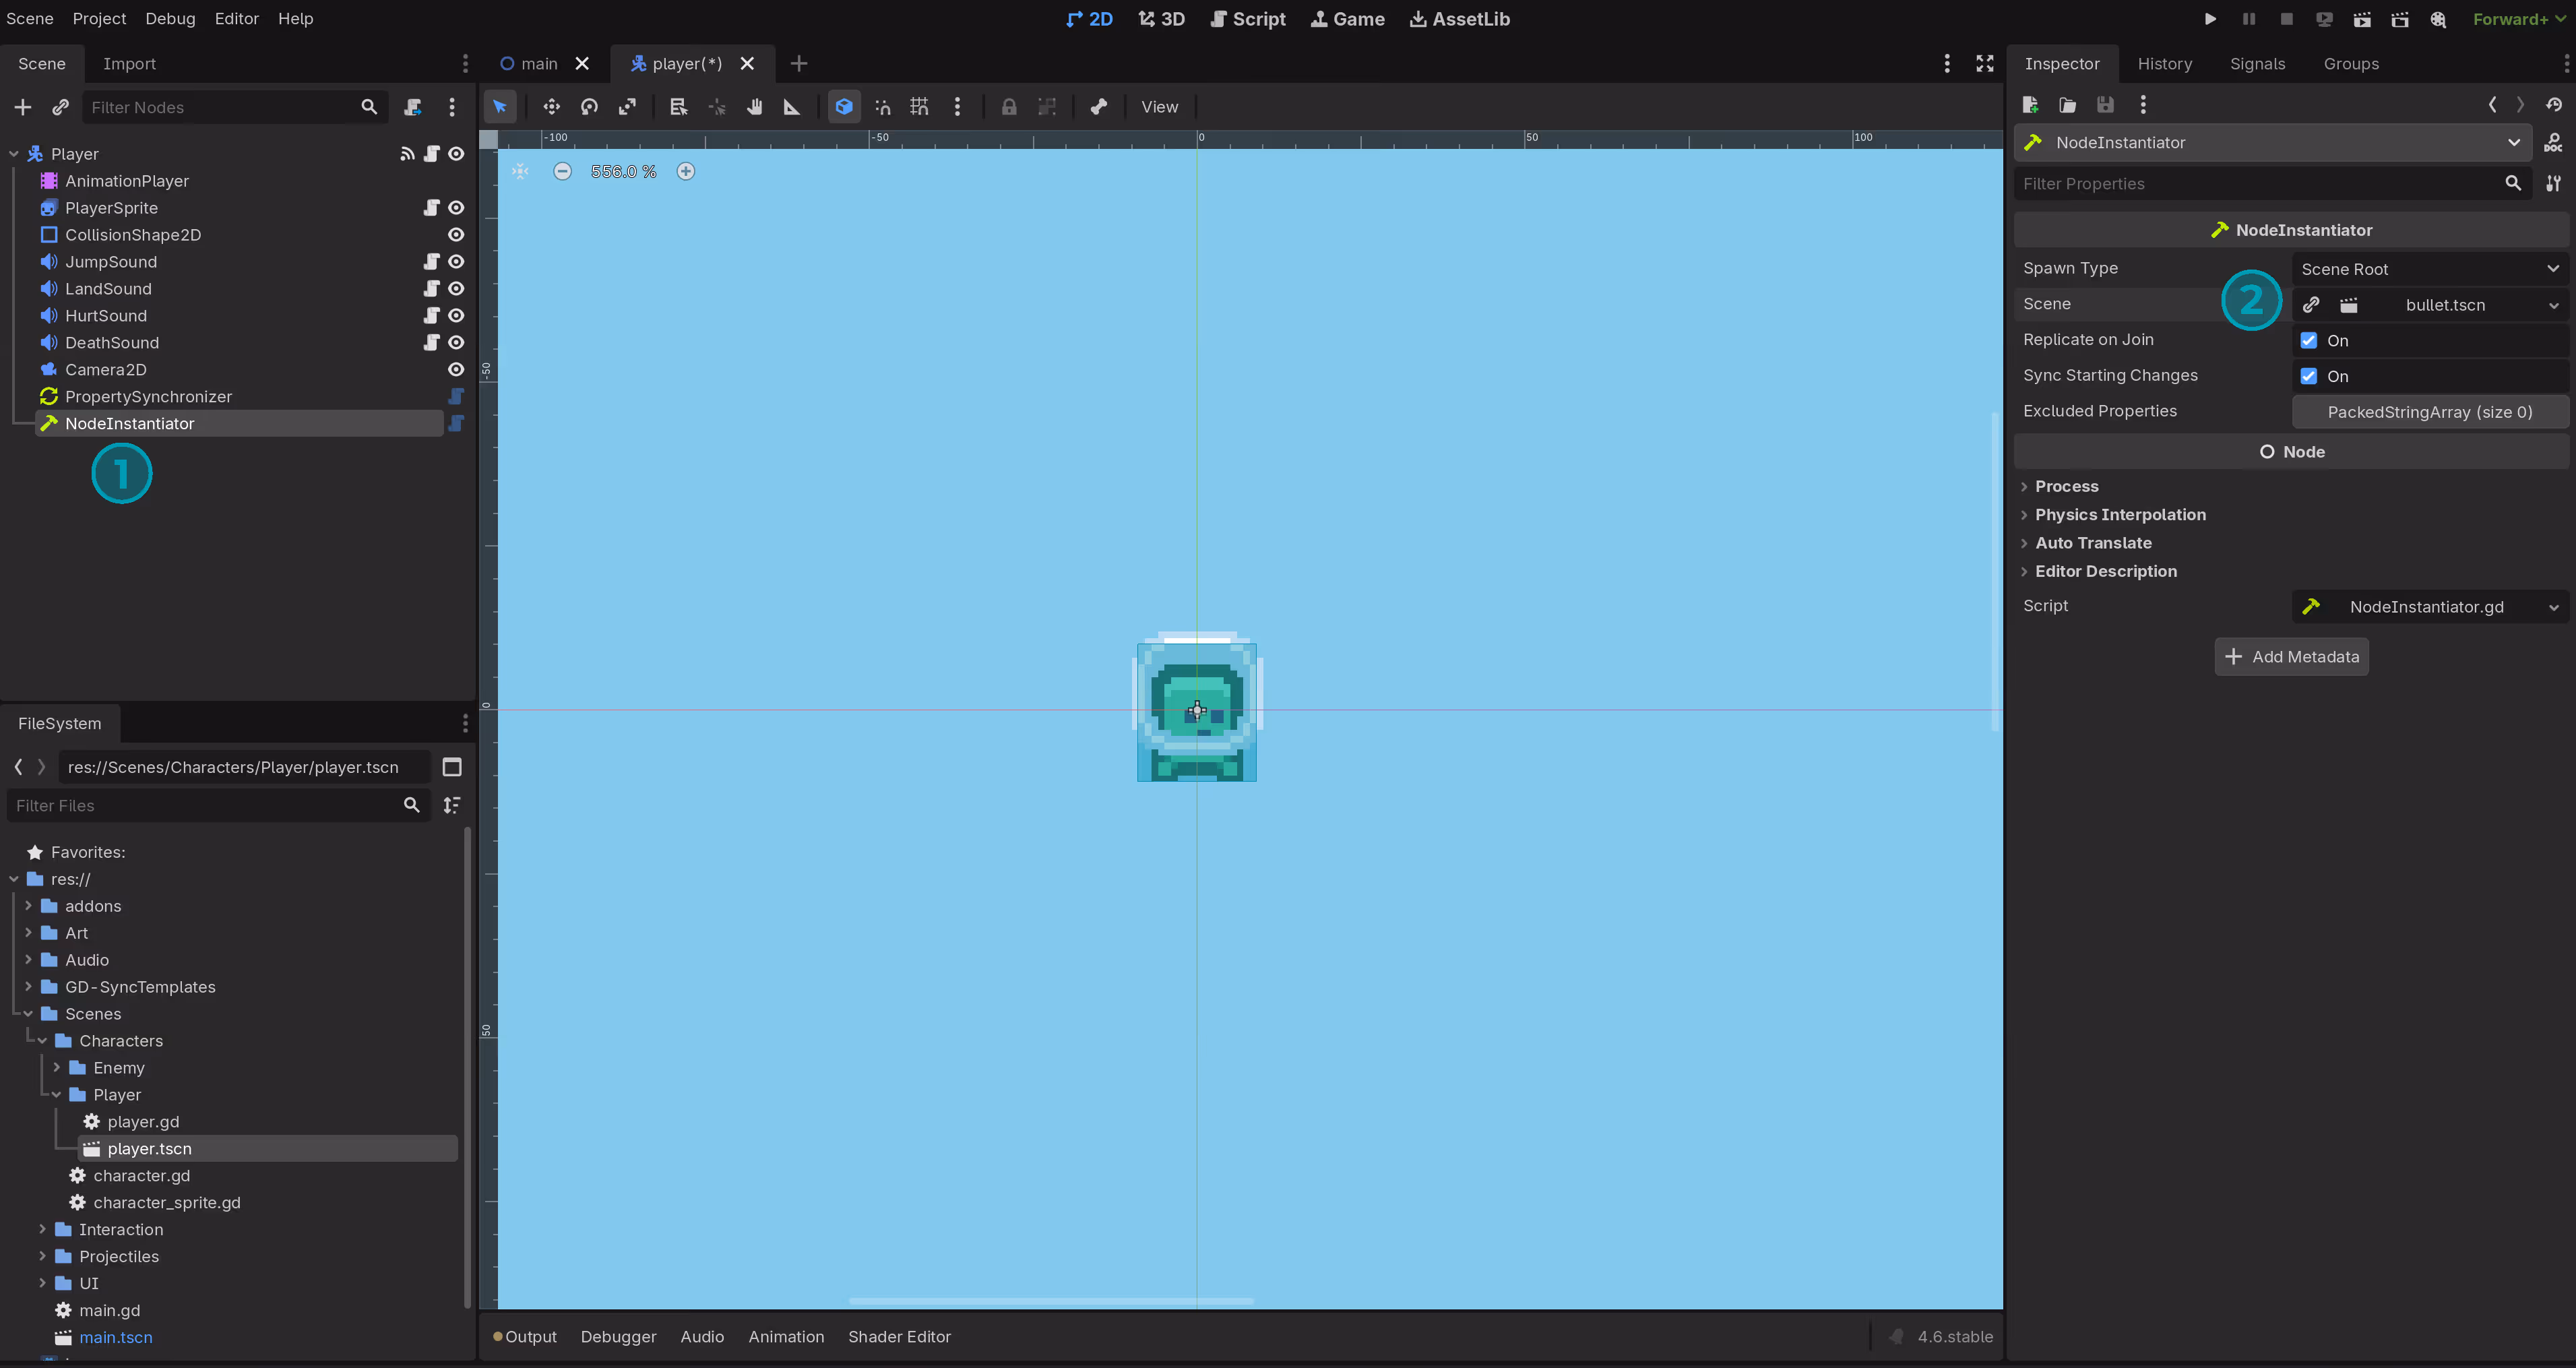
Now that players and their animations are fully synchronized, we can move on to interacting with other objects in the scene. Currently, when the player shoots, bullets are only spawned locally on our own client. We will fix this by using GD-Sync's built-in NodeInstantiator to spawn bullets on all clients at the same time, combined with a PropertySynchronizer to keep their positions synchronized.
First, open the player.tscn scene and add a NodeInstantiator node as a child of the player. In the inspector, assign the bullet.tscn scene as the scene to be instantiated. Next, update the player script to use this NodeInstantiator instead of instantiating the bullet locally. When a player shoots a bullet, we give them ownership of it. Make sure to assign the NodeInstantiator reference in the inspector so the script can access it.
This setup ensures every bullet appears instantly and consistently for all players in the lobby.
Now that bullets are spawning on all clients, we need to make sure their movement is synchronized as well. In this section we will let each player simulate their own bullets locally and broadcast the position to everyone else.
First, open the bullet.tscn scene and add a PropertySynchronizer node as a child of the bullet. Set the Broadcast Mode to When Owner. Because bullets are less critical than players, we can use a lower refresh rate. Set it to broadcast the position 15 times per second. Also enable interpolation so the movement looks smooth on other clients.
Next, update the bullet.gd script so that the bullet logic only runs on the client that owns it. Add a check at the top of _physics_process to return early if this bullet is not owned by the local client.
When it is time to destroy a bullet, we need queue_free to be called on every client, not just our own. GD-Sync makes this easy with remote function calls. We can use GDSync.call_func() to call a function on all clients except ourself, GDSync.call_func_all() to call a function on all clients including ourself, or GDSync.call_func_on() to call a function on a specific client. In this case, we want to destroy the bullet on all clients, so we are going for call_func_all.
Make sure the function you want to call remotely is exposed. By default GD-Sync blocks all remote calls for safety. In the bullet script, use GDSync.expose_func() to allow queue_free to be called from other clients.
This keeps bullet spawning, movement, and destruction perfectly synchronized across the entire lobby.
We must also handle the case when a bullet hits an enemy. In this tutorial, we will run important logic such as enemy AI and bullet collisions on the host client only.
When a bullet hits an enemy, it currently calls the kill function directly. We need to make sure this kill function is executed on the host so all enemy-related logic stays consistent and centralized.
First, open the character.gd script and expose the kill function so GD-Sync can call it remotely. Then in the bullet script, instead of calling kill directly, use GDSync.call_func_on() to call it on the host client. You can get the host client ID with GDSync.get_host(). This keeps all critical enemy logic running only on the host while still allowing every client to trigger it.
If you launch the game now, you should see that bullets are fully synchronized across all clients. They spawn, move, and disappear for everyone in the lobby.
Part 6: Synchronizing Enemies
Enemies are not yet synchronized and are still running their logic locally on every client. We will change this so that all enemy logic executes only on the host and is then broadcast to every other client in the lobby.
First, open the enemy.gd script. We will make two important changes. Add a check at the top of the _physics_process function so the code only runs on the host client and is skipped for everyone else. Second, just like we did with bullets, replace the manual instantiation with a NodeInstantiator. This ensures that coins drop on all clients when an enemy is hit by a bullet. Make sure to add the NodeInstantiator to the enemy, set the coin scene as the scene to instantiate, and assign it to the enemy inspector.
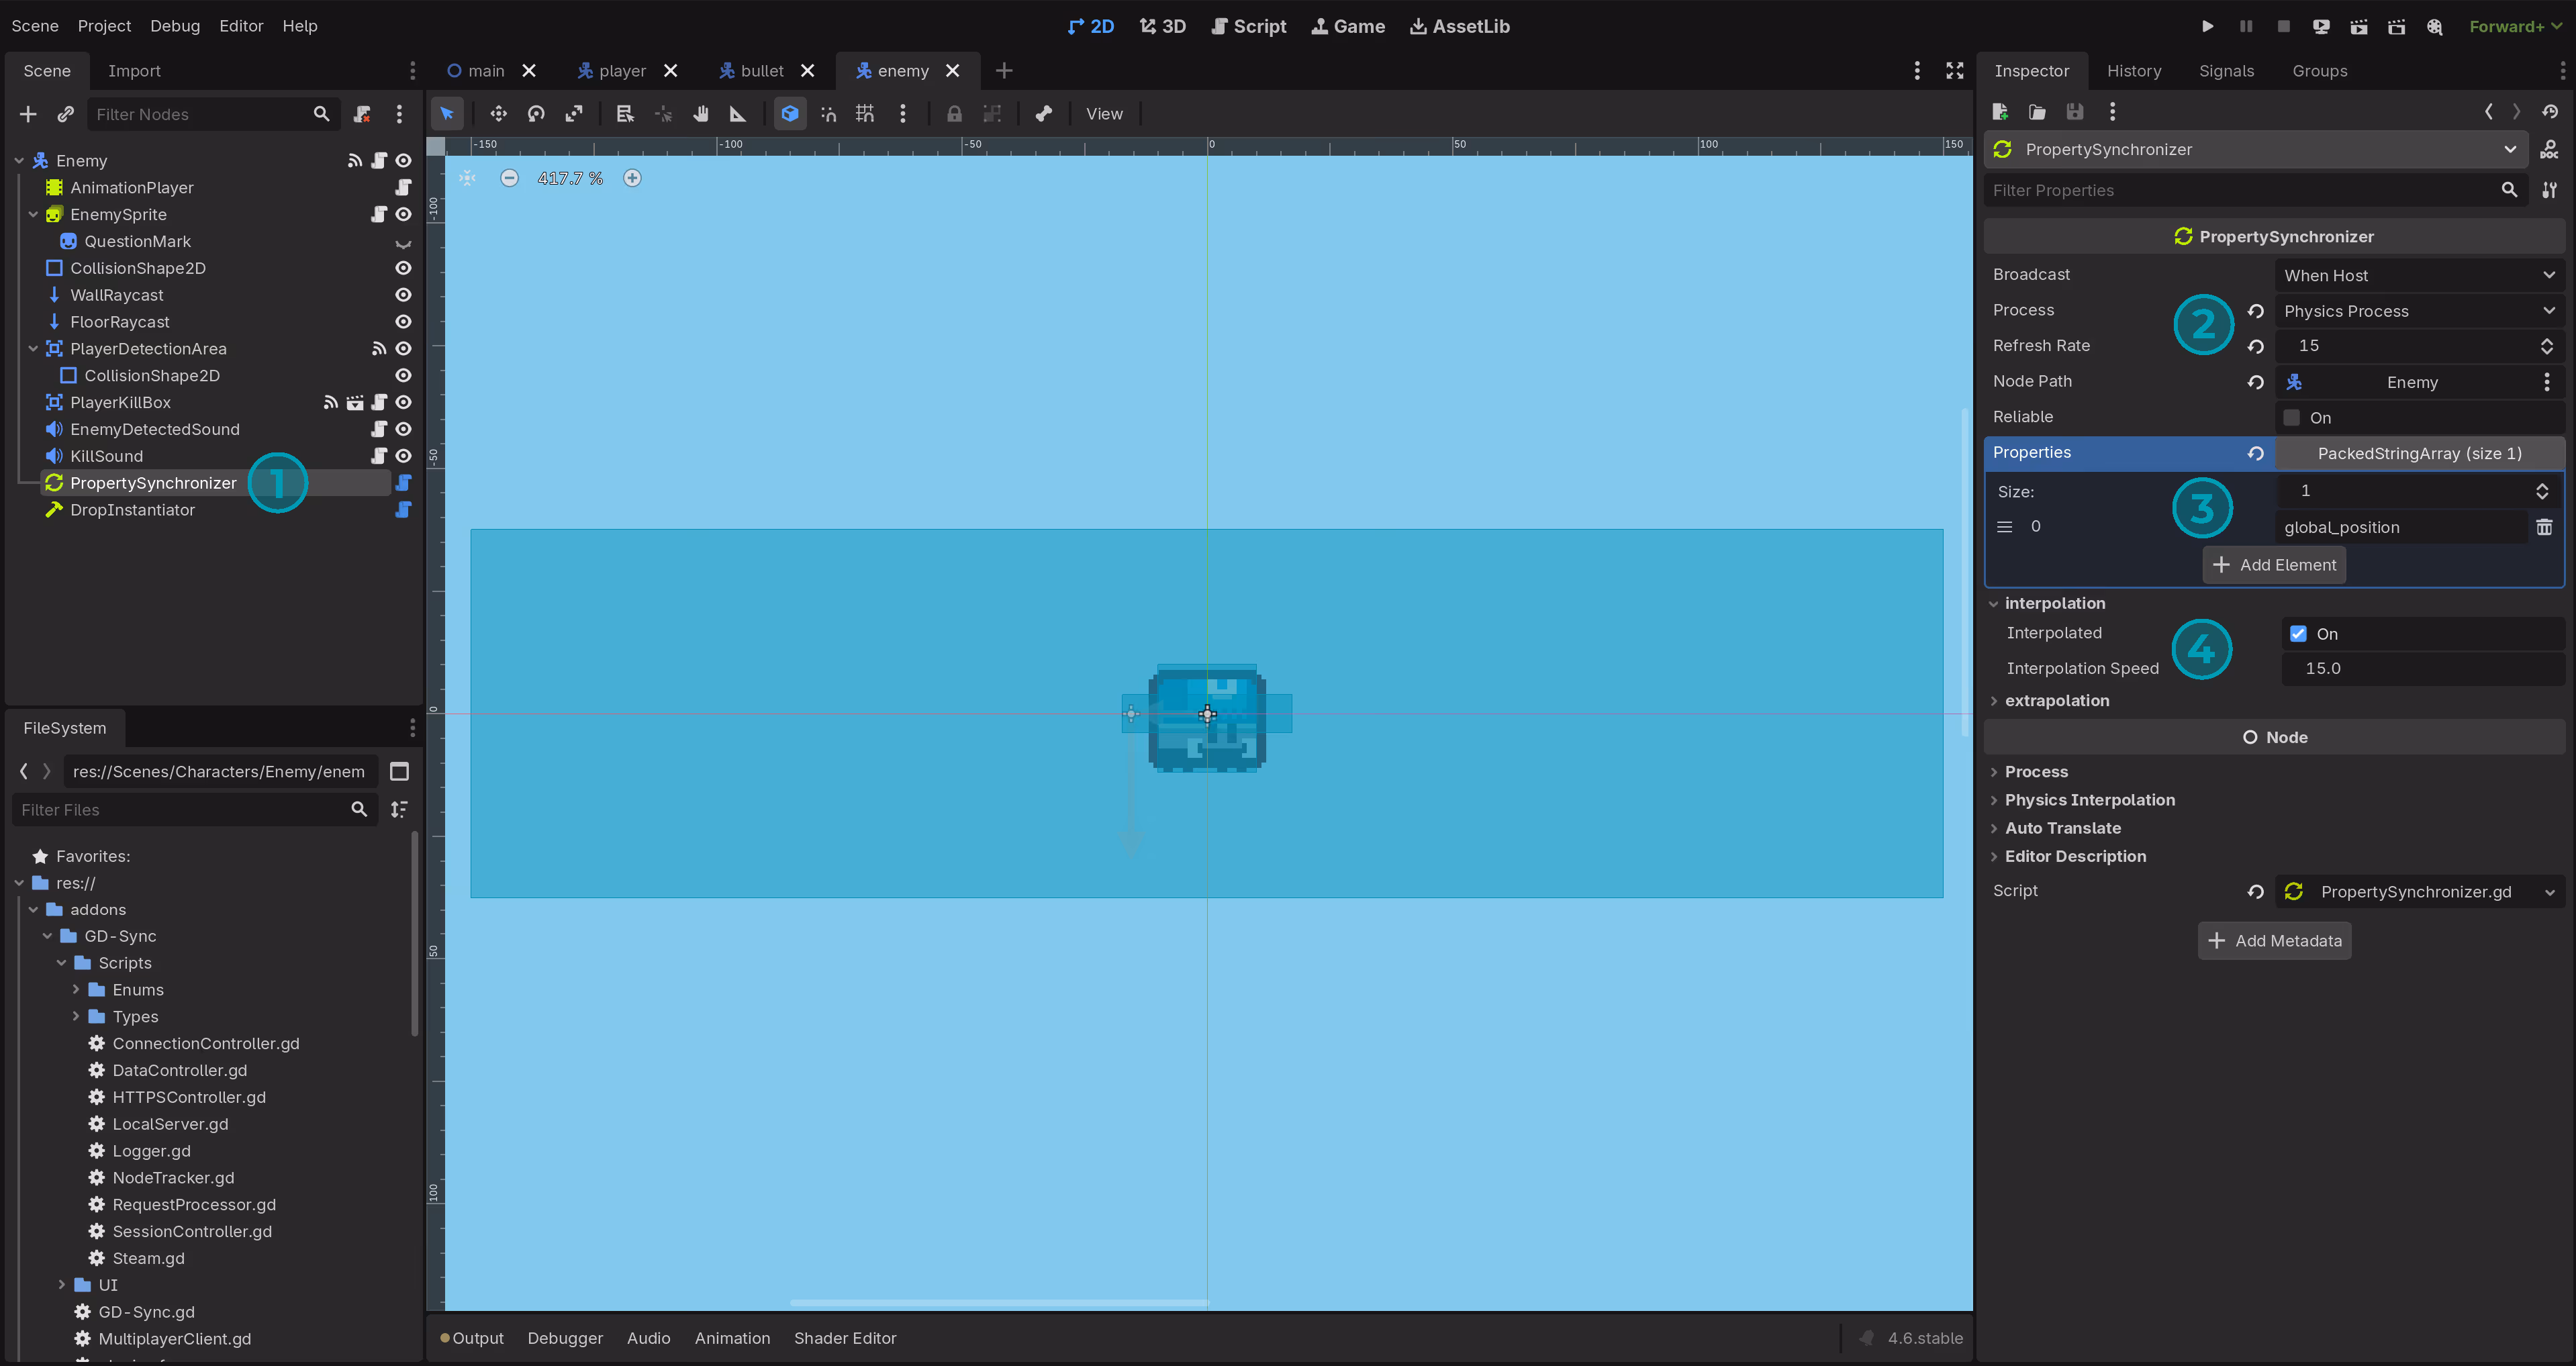
To synchronize the enemy positions, we will do almost the same thing we did for the players. Add a PropertySynchronizer node and set the values in the inspector as shown to synchronize the enemy's position.
The only noticeable difference is that we set the Broadcast Mode to When Host. This ensures the host client is the only one broadcasting enemy positions to the other clients, giving the host full authority over all enemies.
We must also replace the AnimationPlayer with a SynchronizedAnimationPlayer, just like we did for the player. Right-click on the AnimationPlayer node in the scene tree and change its type to SynchronizedAnimationPlayer.
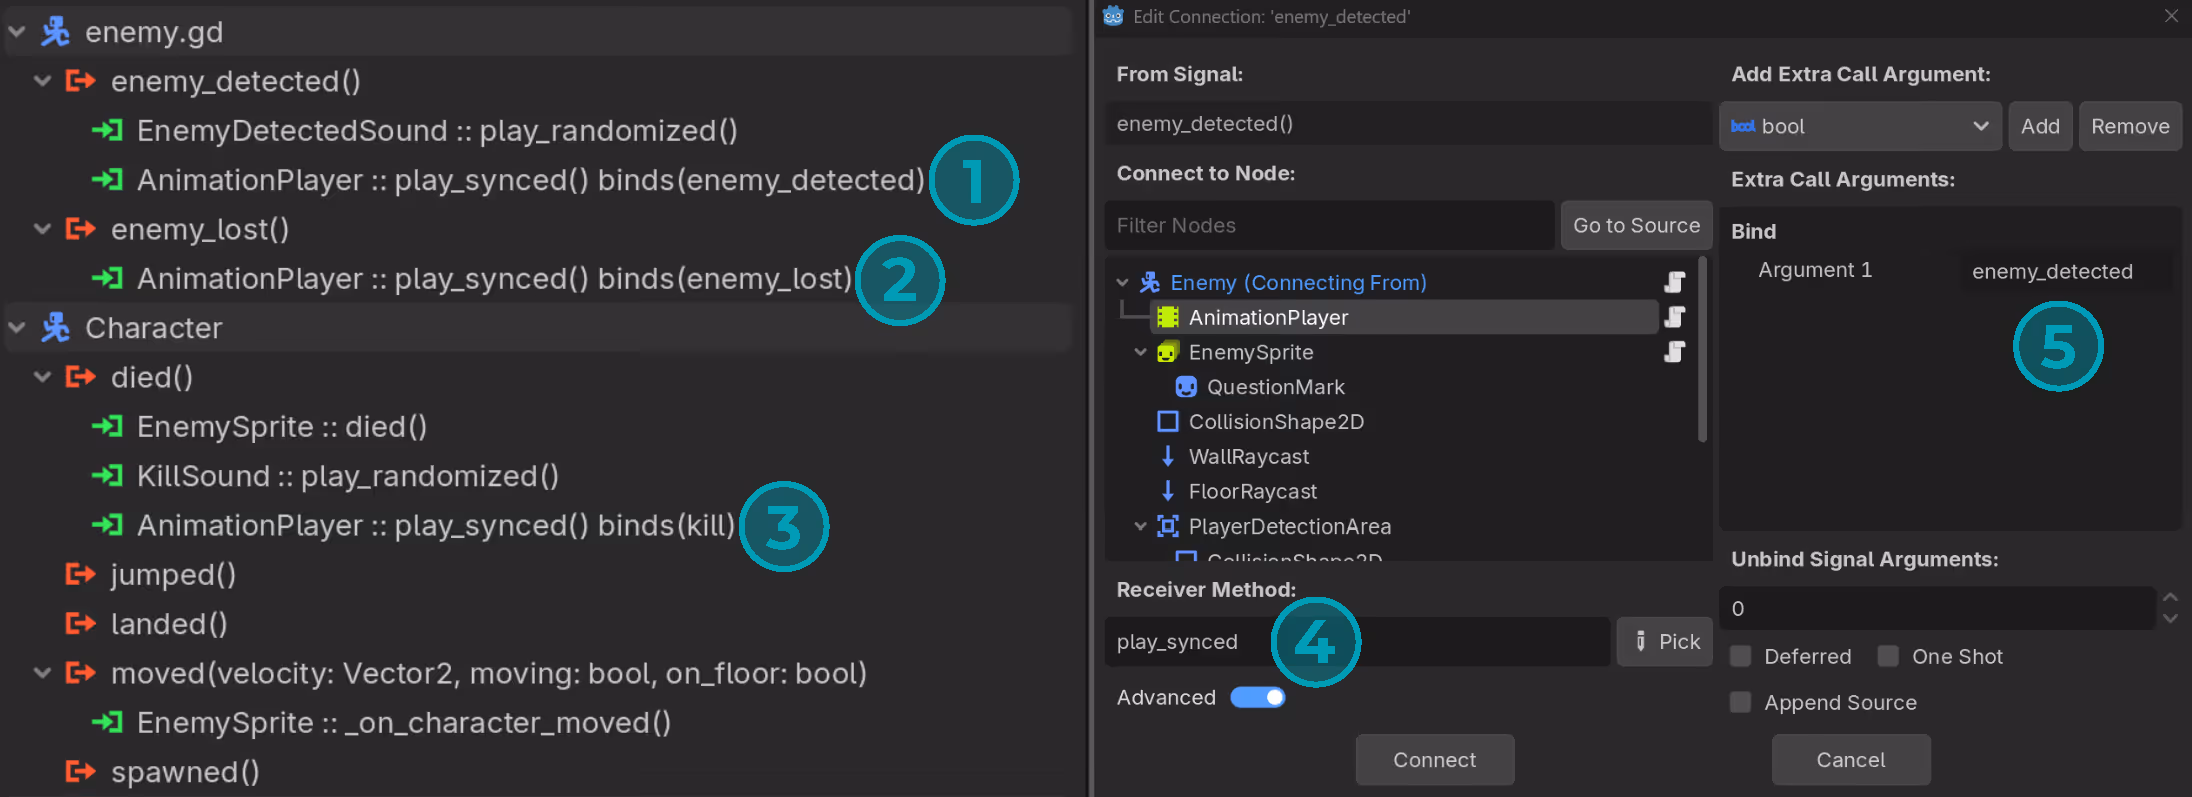
Changing the node type resets the signal connections, so we need to restore them. The enemy_detected signal should call play_synced with "enemy_detected" as the animation name. The enemy_lost signal should call play_synced with "enemy_lost" as the animation name. The died signal should call play_synced with "kill" as the animation name.
You can edit the signals by right-clicking on them and selecting Edit. Make sure the connections exactly match the setup shown in the image below.
Part 7: Picking Up Coins
To finish the tutorial, we only need to synchronize coin collection.
First, open the coin.gd script and add a check to ensure that only our own player can pick up the coin. Next, we need to make sure that when any player collects a coin, it gets hidden for everyone else in the lobby. To do this, create a new function called hide_coin. Expose this function so it can be called remotely, then use GDSync.call_func_all() to call it on all clients when a coin is picked up.
This final step ensures coins are collected cleanly and consistently across all players.